

How I make Monkey Cake Pops! Make your cake pop dough, this is how I do it in case you were wondering!
To pull off monkey’s that look like monkeys, you first have to figure out a shape and stick to it. If they are all free formed or “eyeballed” they will probably end up not looking like what you had envisioned 😉 So to make them consistently, this is how I get the basic shape!
We always start with The Easy Roller around here! Whether using it to roll perfect cake balls or just to portion cake dough it is an amazing tool that gives you great results every time. For these Monkey cake pops, even though they are hand formed I will start with a ball shape. So I will use my Easy Roller to make all the cake dough into 1.25? rounds
Once you roll all the cake balls take a cake ball and a cake pop stick.

Find the middle of the cake ball and indent the cake ball in a half circle shape across the front of the cake ball. This is going give the face the dimension of a monkey.

Next, use your fingers to further shape the cake ball. Just smooth out the creases by pressing on both sides of the crease individually.
Next get your regular sized M&M’s. I originally bought the tiny sized ones, thinking they would be best, but they are way too small!! The Regular sized ones are perfect! Put a tiny bit of chocolate on one side of the M&M and stick it ½ way into the cake ball. Place them right in the center of the ball on each side, for the Ears!

Put these in the fridge till they are a little firm. Not too long as we don’t want them to crack, just long enough to where you are comfortable dipping. I put them in the cake pan with tin foil on top and put it in the fridge until I have all the candy melts ready for dipping.
For dipping, start by warming the milk chocolate candy melts and then dip the entire cake pop into the milk chocolate melts. Place them upright to set.

While these are setting take a bit of the milk chocolate melts and add about double the amount of white chocolate candy melts. Put this mixture into a piping bag and snip off a small corner.

I think the easiest way to make the face is to quickly outline it in a “scribble” type fashion, starting with an “M” toward the top and them a sideways oval underneath.

Then once I have the basic shape, I quickly fill it in by moving the melts around with the tip of the piping bag and when I have it all covered I quickly (and carefully) shake the cake pop side to side to even out the melts on the face (so it’s not all lumpy)

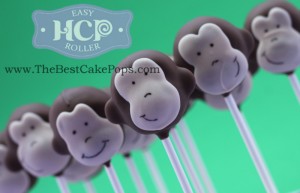
Here is what it should look like if the cake doesn’t fly off the stick;)!! …just kidding I haven’t lost one like that yet;)!

Once it sets it’s time to add the final touches. A simple face with the food coloring pens! You can pipe it on as well, but I think the pen looks “cleaner.” This is an Americolor black pen. I think this is the brand that works best (but even with these I have had a few that came not working.) I think some are just better than others! But when you find one that works they are fabulous! Don’t press hard, or they definitely don’t work. The lighter the better! I like the little sideways half grins for the mouth. I make a downward arch for the nose and just 2 dots for the eyes!

TA DAAAA!! If you like the tutorial don’t forget to check out and share our Easy Roller with your friends! It is how we keep these tutorials coming:)!
