
Another tutorial brought to you by the Easy Roller and New Mini Easy Roller:)! This time it’s Basketball Cake Pops!! Not just plain basketballs either! These will be a “Slam Dunk”!! Hee Hee:)

Here are a few things you may want to have handy:

Lets start by baking a cake! Any cake will do, I bake from cake mixes and prepare them according to the back of the box. After it cools, start breaking it into crumbs and knead the crumbs and maybe a heaping TBS of frosting until it forms into a big ball of dough. I like to use a food processor to mix the cakes into dough because it is Fast and Easy and I don’t need any frosting – unless I want to add it for flavoring! Take a look how the cake will turn to dough (just the cake, no frosting!!) right in there:

Now that we have the center of our cake pops (the Cake Dough) ready to go, it is time to form them into balls to be dipped! You can do this by hand but it is so much Easier with the Easy Roller or the New Mini Easy Roller😉 They are all the same size, and shape and you can predict how many cake pops one cake will make (about 30-32) Here is how you do it!
You can chill these for about 30-45 minutes in the refrigerator if you need them to be a little easier to dip, but if you refrigerate these too long the coating will crack as it dries:( There is a fine line between easy to dip and ruined cake pops, so no more then 45 minutes in the fridge!
Next prepare the candy melts. You can buy orange or make it yourself with “candy color” food dye. Make sure it says candy color or that it is oil based or you will ruin the candy melts. A little goes a long way so stir between dropping color!

Once you are happy with your orange color take the cake pop stick and dip it into the candy melts

Then stick the stick into the cake pop…

You can either wait for that to set or not, it’s up to you! It is a tiny bit easier to dip if the candy melts have set up here at the stick, but the downside is you will see little lump of chocolate at the bottom by the stick and the chocolate will be a little thicker here as well. I like it to be completely smooth and the same consistency all around, so I will continue to dip this before it sets.

Dip your entire pop into the Orange melts and tap off any excess and place it in a cake pop stand to dry.

Next it is time to put a little bit of red candy melts into a piping bag. I never dye white to make red, it doesn’t really come out that well (think “Pepto-Red”), so the deep colors like red, I buy pre-mixed! Melt it down in the microwave on 50% power for about 30-45 seconds and snip the corner off.
What we are going to do is slowly turn the cake pop while holding the piping bag still and giving it an even pressured squeeze! Let the turning of the pop in your other hand draw the line around the cake pop. If you try to pipe a line around the pop it’s much harder and may not look as nice.

Place it dry in your cake pop stand!

Next you will get some milk chocolate candy melts and place them into a piping bag for melting on 50% power for 30-45 seconds. Snip the corner off and pipe an “X” on top of the cake pop. Starting and stopping at the red “rim.”

Now pipe the two “U” like lines on either side of one of the horizontal lines

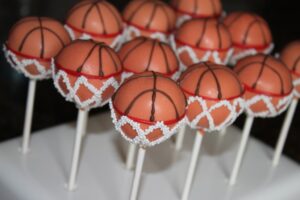
For the next step you will need white candy melts in a piping bag, and the little non-pareils in white. Melt the white melts on 50% power for 30-45 seconds, snip the edge and go around the cake pop in a “X” like motion, making sure to overlap the white “X’s”. This doesn’t have to be perfect so if you can’t get just like this that will still work!

Before this sets take the non-pareils and shake them over the wet lines. The sprinkles with stick to them and make a cook “basket effect”! Take a look!

Don’t forget to take a look at our Easy Roller and/or the New Mini Easy Roller! It is how we keep these tutorials coming;)!