
I am so excited about these “Vintage Cake Pops”! What is even more exciting is they were actually pretty simple to make!! I bet you will impress all your friends with this exquisite design!! These are the Perfect cake pops for an extravagant wedding, to go along with your over the top Tea Party, maybe upcoming Holiday Parties?! Want to see how we make them? I bet you can do it!!
It all Starts with SugarVeil and SugarVeil Icing! SugarVeil came out with this Brooches Mat and I think it is perfect for cake pops! Start by mixing up a batch of SugarVeil Icing as instructed on the packaging. Next lightly dusting the mat with cornstarch and shake off excess.

Put a dollop of SugarVeil Icing onto the Brooches Mat.

Next with the SugarVeil Icing Spreader, spread the SugarVeil across the Brooches Mat. Make sure to swipe the SugarVeil Icing in all directions to ensure the icing gets into the entire design evenly. When you are done, wash and dry the SugarVeil Spreader and then run it over the mat one more time.

You should have something like this! You can leave it out to dry or place it in the oven with the lamp on for a faster set time. When set, SugarVeil will feel firm to the touch (not sticky) and will not distort or stretch out of shape.

Stretch the mat at the top, to get an end loose. Turn the mat down toward your work surface. Gently peel back just enough of the Sugarveil Icing that you can place the SugarVeil Spreader over the design and then peel back the mat. Inching forward the spreader as you go to hold down the released SugarVeil until it is all free.

Next with a pair of embroidery scissors cut out the brooches you like!

Like this…

Then I took some candy clay! Don’t know what that is?! That is OK! You can see how to make it with just your candy melts and a little corn syrup Here! Roll up a little into a ball and then flatten it out just a bit and place one the Sugarveil Brooches over top of the candy clay disc.

Next take a tooth pick or cocktail stick and press down at all the intersecting points letting the candy clay come through the SugarVeil like this!

and this…

Trim away any excess Candy Clay.

If you wish you can dust these brooches with gold/bronze Pearl Dust. I dusted half of the brooches and then half of the cake pops! Another great thing about these brooches is you can make them up ahead of time and use them when you need them, then you can have these super elegant cake pops ready to go in pinch!

Speaking of Cake pops! Time to make some cake pops!! When it comes to cake pops, and depending on how many you need make you can bake a whole cake to make cake pops with or just use the scraps (left overs from leveling cakes or yesterdays’ cupcakes!!) I bet there might even be some in your freezer right now;)! If I am baking a whole cake, I just use a box cake and follow the instructions on the back! 3 eggs, 1 1/4 cup of water and 1/2 cup of oil is what most boxes call for! Bake the cake in the oven till it is fully cooked and then once it cools knead it down into a doughy consistency! I like to put my cakes into the food processor, because it is fast and consistent every time! I also need very little icing and most times I don’t need any at all! If it turns into a big ball of dough in the food processor within about 2 minutes then I don’t add any frosting, if it doesn’t, well then I add about 1 TBS at a time until it does!
Here is a little picture so you can visualize what I am talking about! However you do it, by hand, in the Stand Mixer, or Food Processor you are just looking for an end result to look similar to play-doh and consistent throughout.
 Next Roll all your dough into little 1.25″ balls! If you make cake pops often you are gonna want to check this out! The Easy Roller can roll 21 balls at a time and I can roll more then 500 in a hour! Here is a little 30 demo if you have never seen it in action!
If you will never make that many cake pops (or cookies …even meatballs!) but you still like the Easy Roller, check out our new Mini Easy Roller! This one rolls 9 at time at a fraction of the price:)!
Next dip them in candy melts or Almond Bark and place them on wax paper to set! But wont they have “flat bottoms” if I set them down on wax paper? Are you sure you typed that right?! I want them to be “lollipop” style!! Yes!! You heard me right! Place them on wax paper, like this! Cake pops are so much faster and easier when you make them this way, with the sticks up, so why would you work harder then you need to:)!!

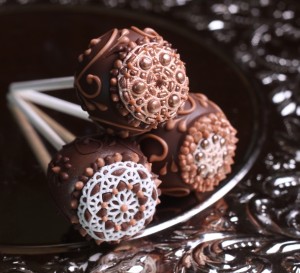
However when you put them in you favorite cake pop stand you don’t want them to look like this, right?! Of course not!! That is what we made those SugarVeil Brooches for!!

So next you can dust them with gold/bronze pearl dust if you wish, like I said I dusted half of them.

When I dust them I just dip my dry brush into the pearl dust and brush it all over the cake pop! It will turn out like this…

Then just pop the SugarVeil Brooch on top (you can use a bit of melted candy melts as “glue”) and the space you see… cover those in super simple piped dots! I alternated a lighter and darker brown.

If your SugarVeil Brooch is smaller then the flat top of your cake pop, no problem, just pipe more dots see, it all works out;)!!

If you want to get fancy just pipe a few “S” swirls around the outside of the cake pops and add a couple more dots, however the brooches by themselves are stunning. That’s it! It looks complicated but really just the SugarVeil Brooches and some piped dots!!
If you like the tutorial don’t forget to check out, and share our Easy Roller (or our new Mini Easy Roller!) with your friends! It is how we keep these tutorials coming:)!