
I am going to start this post by saying, this is only my 3rd wedding cake I have ever made!! I say that because I recognize I still have a lot to learn, but that doesn’t change the fact that I like to put these tutorials together! I want to inspire people to start baking, because anyone with a little, ok (A LOT), of patience can make some pretty amazing things if they only had the right tools and know how! Throughout this post you will find links to products/tools I used to get this done. I do that, because it’s one of the most commonly asked questions I get! Where do I get this, or what brand are you using there. So as kind of a reward for reading my post and following my run on sentences and questionable grammar, I am sprinkling the post with fun little links and trying to make it easy for you to find everything I used! Let me know if I missed something:)!
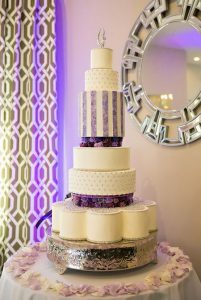
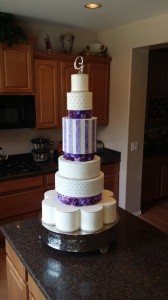
This wedding cake was my gift for a young man I have had the pleasure of knowing since he was born, kind of like my little brother. So of course it had to the best cake I could make:)! The bride’s colors were silver and any and all shades of purple! Thankfully the bride was open to whatever I wanted to make, which makes things so much easier. Her only request was that it have traditional style roses on it and that it would serve about 140 people. I knew I wanted to try a Tall Cake, so I went on Pinterest to look for tall wedding cakes! Keeping in mind what I was capable of doing, of course. After looking for quite a while, weeks really, the one that was my absolute favorite was this Tall Cake by The Sugar Sugar Cake Studio. Isn’t it stunning? I basically adapted this cake to my skill level, supplies I had and her colors! It was not my intention to copy it just draw inspiration from it.
First things first, sketch out your cake. This will give you and your client (or friend) an idea of what you are making and also serves as a road map for you as you go! Don’t worry if you are not the best artist in town! It’s just a sketch! If you are really worried about it there a bunch of cake sketching apps you can try!
Here is my sketch, let me walk you through it.
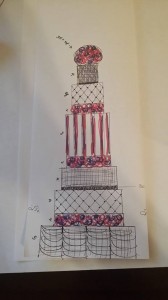
From Bottom up! 9 levels – here we go!
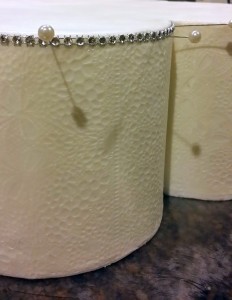
#1-The First Tier – Dallas Foam Petal Tier 19 inch in diameter 5 inches high, with a 1 inch hole drilled through the center. Covered in Fat Daddios White Fondant and then over laid with SugarVeil Icing in the Circle Bouquet Mat. The top and bottom ridge will be lined in ribbon. The top with a string of faux diamonds and on top a hand embellished string of faux diamonds adorned with silver dragees on either side. This tier will have 3 sizes of silver dragees affixed to the top (3MM, 4MM, and 5MM).
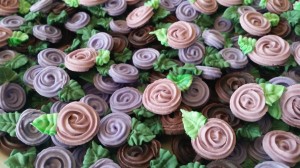
#2-Next up more Dallas Foam! A round 9 inch in diameter, 2 inch high, with a 1 inch hole drilled through the center. This tier will be covered in Fat Daddios Purple Fondant and trimmed in faux diamond ribbon. It will be full of small hand made roses in several shades of purple!
#3- This is Red Velvet Cake baked in 2 Fat Daddios 12 inch round pans! The cakes will be leveled and filled with home made cream cheese icing. This tier should be 4 inches in height. This tier will be covered in Fat Daddios White Fondant. I will make a quilted pattern on this layer and put 5mm silver dragees in the cross section. This tier will serve 56!
#4-This is Red Velvet Cake baked in 2 Fat Daddios 10 inch round pans! The cakes will be leveled and filled with home made cream cheese icing. This tier should be 4 inches in height. Covered in Fat Daddios White Fondant and then over laid with SugarVeil Icing in the Circle Bouquet Mat. The top and bottom ridge will be lined in ribbon. The top with a string of faux diamonds and the bottom a hand embellished string of faux diamonds adorned with silver dragees on either side. This tier will serve 38!
#5- Dallas Foam round 9 inch in diameter, 2 inch high, with a 1 inch hole drilled through the center. This tier will be covered in Fat Daddios Purple Fondant and trimmed in faux diamond ribbon. It will be full of small hand made roses in several shades of purple!
#6-This is my Tall Tier! This is Red Velvet Cake baked in 4 Fat Daddios 8 inch round pans! The cakes will be leveled and filled with home made cream cheese icing. This tier should be 8 inches in height. This tier will be covered in Fat Daddios White Fondant and then over laid with painted strips of fondant off pieces cut into 1 inch by 8 inch strips. This tier will serve 48.
#7- Dallas Foam round 9 inch in diameter, 2 inch high, with a 1 inch hole drilled through the center. This tier will be covered in Fat Daddios Purple Fondant and trimmed in faux diamond ribbon. It will be full of small hand made roses in several shades of purple!
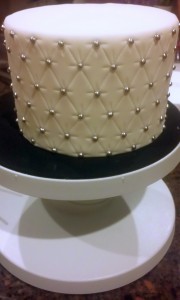
#8-Dallas Foam round 6 inch in diameter, 4 inches high. This tier will be covered in Fat Daddios White Fondant. I will make a quilted pattern on this layer and put 5mm silver dragees in the cross section.
#9 Dallas Foam round 4 inch in diameter, 4 inches high. Covered in Fat Daddios White Fondant and then over laid with dried SugarVeil Icing in the Circle Bouquet Mat. The top and bottom ridge will be lined in ribbon. The top with a string of faux diamonds and on top a hand embellished string of faux diamonds adorned with silver dragees on either side. The top will have a bouquet of flowers. – Flowers take a LONG time to make I ended up editing this tier topper to a silver monogram “G” adorned with faux diamonds. It is just a sketch by the way;)
I started with the hand made decorations! Like the ribbon, hand painted fondant strips and the roses!
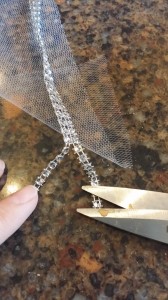
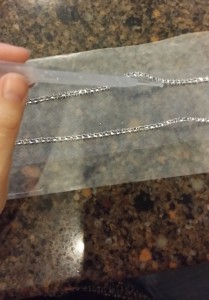
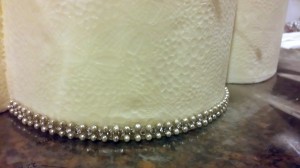
The first thing I made was the hand embellished string of faux diamonds adorned with silver dragees on either side. *These are non edible, and I left instructions with the Chef at the venue to remove prior to cutting.
To re-create this you will need:
- Faux diamond ribbon – These come in strands that are 2-8+ rows high of Faux diamonds. Mine was just 2 rows and was $1 or less!
- Strip of Tulle
- Pipette/paint brush
- 4mm Silver Dragees
- Corn Syrup
- Wax Paper
First cut the Faux Diamond ribbon so that you have one long strand.
Next cover your surface with wax paper.
Lay the tulle on the wax paper
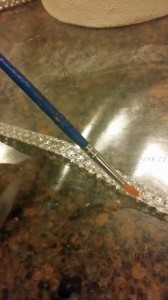
Using Corn Syrup and a pipette (easier) or a paint brush brush the tulle with the corn syrup and stick the faux diamond strand to the tulle
Get your 4mm silver dragees ready… and a chair, this will take some time;)!
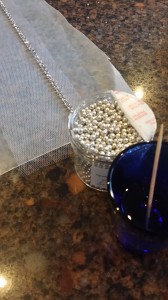
I found using the pipette to be the fastest at adding the dragees too! The paint brush will work though. Now just add some corn syrup to the edge of the strand of faux diamonds and put a silver dragee on either side, right in between each diamond.
Make sure you are creating these in usable lengths! You don’t need to make them as long as I did!! Just measure around the cake tiers and make them about an inch longer just for good measure! I had the room to make really long strands that I cut to size later, but it would have been smarter to make them shorter;)!
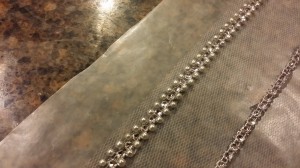
Once you have finished, leave them over night to dry. Once they are dry carefully flip them over and peel them away from the wax paper to let the back side dry thoroughly as well.

Once they are completely dry use a pair of embroidery scissors to cut away all the extra tulle. Then set aside until you are ready to apply them to your cake. If you would rather skip this step and buy the strands, they are about $7-$9 a yard online, it would have added over $100 to the cost of this cake so I made more then I needed for for under $10, most of which were the Silver Dragees, I needed about 6 oz.
Now for all the Flowers
I need to make about 150 mini roses! Here is my Real Rose model.. I always find it helpful to keep a picture close by of what you are trying to make, regardless of what it is.

To make these flowers you will need:
- Cold porcelain/gum paste
- Toothpicks
- Clay to make the buds if you don’t have drying time and you are making them from Cold Porcelain
- Food Color (for gum paste)/ Oil Paints (for cold porcelain)
Materials Used:
- 1 Cup of Corn Starch
- 1 Cup of White Glue
- 2 Table Spoon of Lemon Juice or Vinegar
- 2 Table Spoon of Baby Oil
- Microwavable bowl
- lotion
- Mix the cornstarch and glue in a microwave safe bowl, stir until fully incorporated and the there are no lumps. Then add the baby oil and lemon juice/vinegar.
- Put it in the microwave for 15 seconds. Take it out and stir thoroughly. Repeat about 8 times (depending on your microwave)
- Once it starts to thicken and sticking together to form a more solid ball, it has been cooked enough.
-
Use the lotion to heavily coat your hands and work surface.
-
Then turn out the mixture and knead it till it no longer sticks to your hands! About 10 minutes.
While I was waiting for these buds to dry out, I got my purple fondant and covered all three of the 2 inch high Dallas Foam Styrofoam circles and lined the top with the extra faux diamond ribbon. I used corn syrup to adhere the ribbon to the top.
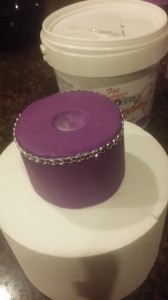
I made these tiers purple just so if you were to look through all the roses or if there were a gap between the roses you would just see purple or diamonds, not styrofoam:)!
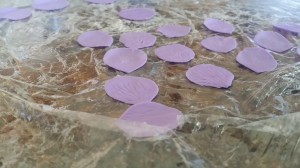
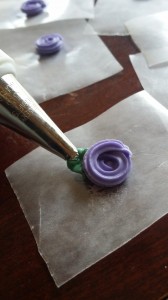
Now that everything is prep’d, it’s time for the fun part!! I rolled out the CP pretty thin and put it on a piece of clear wrap dusted in corn starch (if you just leave it on your work surface it will stick…I’ll give you 3 guesses how I found that one;))!
Then cut out 17 petals per rose. I used a set that had 5 petal sizes. I used 2 sizes and they were the 2nd and 3rd from the smallest! I cut 10 from the smaller cutter and 7 with the larger one.
Then I used a rose veiner on each petal. Mine looks like this

If you can roll out the paste, use the cutter to cut them, and then vein them quickly enough, you can cut out enough petals for 2 roses at once. Just make sure you are covering your petals as you go, or at least until you get them veined. If they start to dry out, & the edges dry first, they will not vein well.
I made them all in 6 layers
Small size petal:
- 1 petal to cover the top of the bud (so now white showed through)
- 2 petals for the first layer
- 3 petals for the next layer, tucking each petal half way under the last.
- 4 petals for the next layer
- I used 4 of the larger petals on the next row tucking each petal half way under the last.
- and finally in the last row I used 3 of the petals in the spaces to fill the gaps.
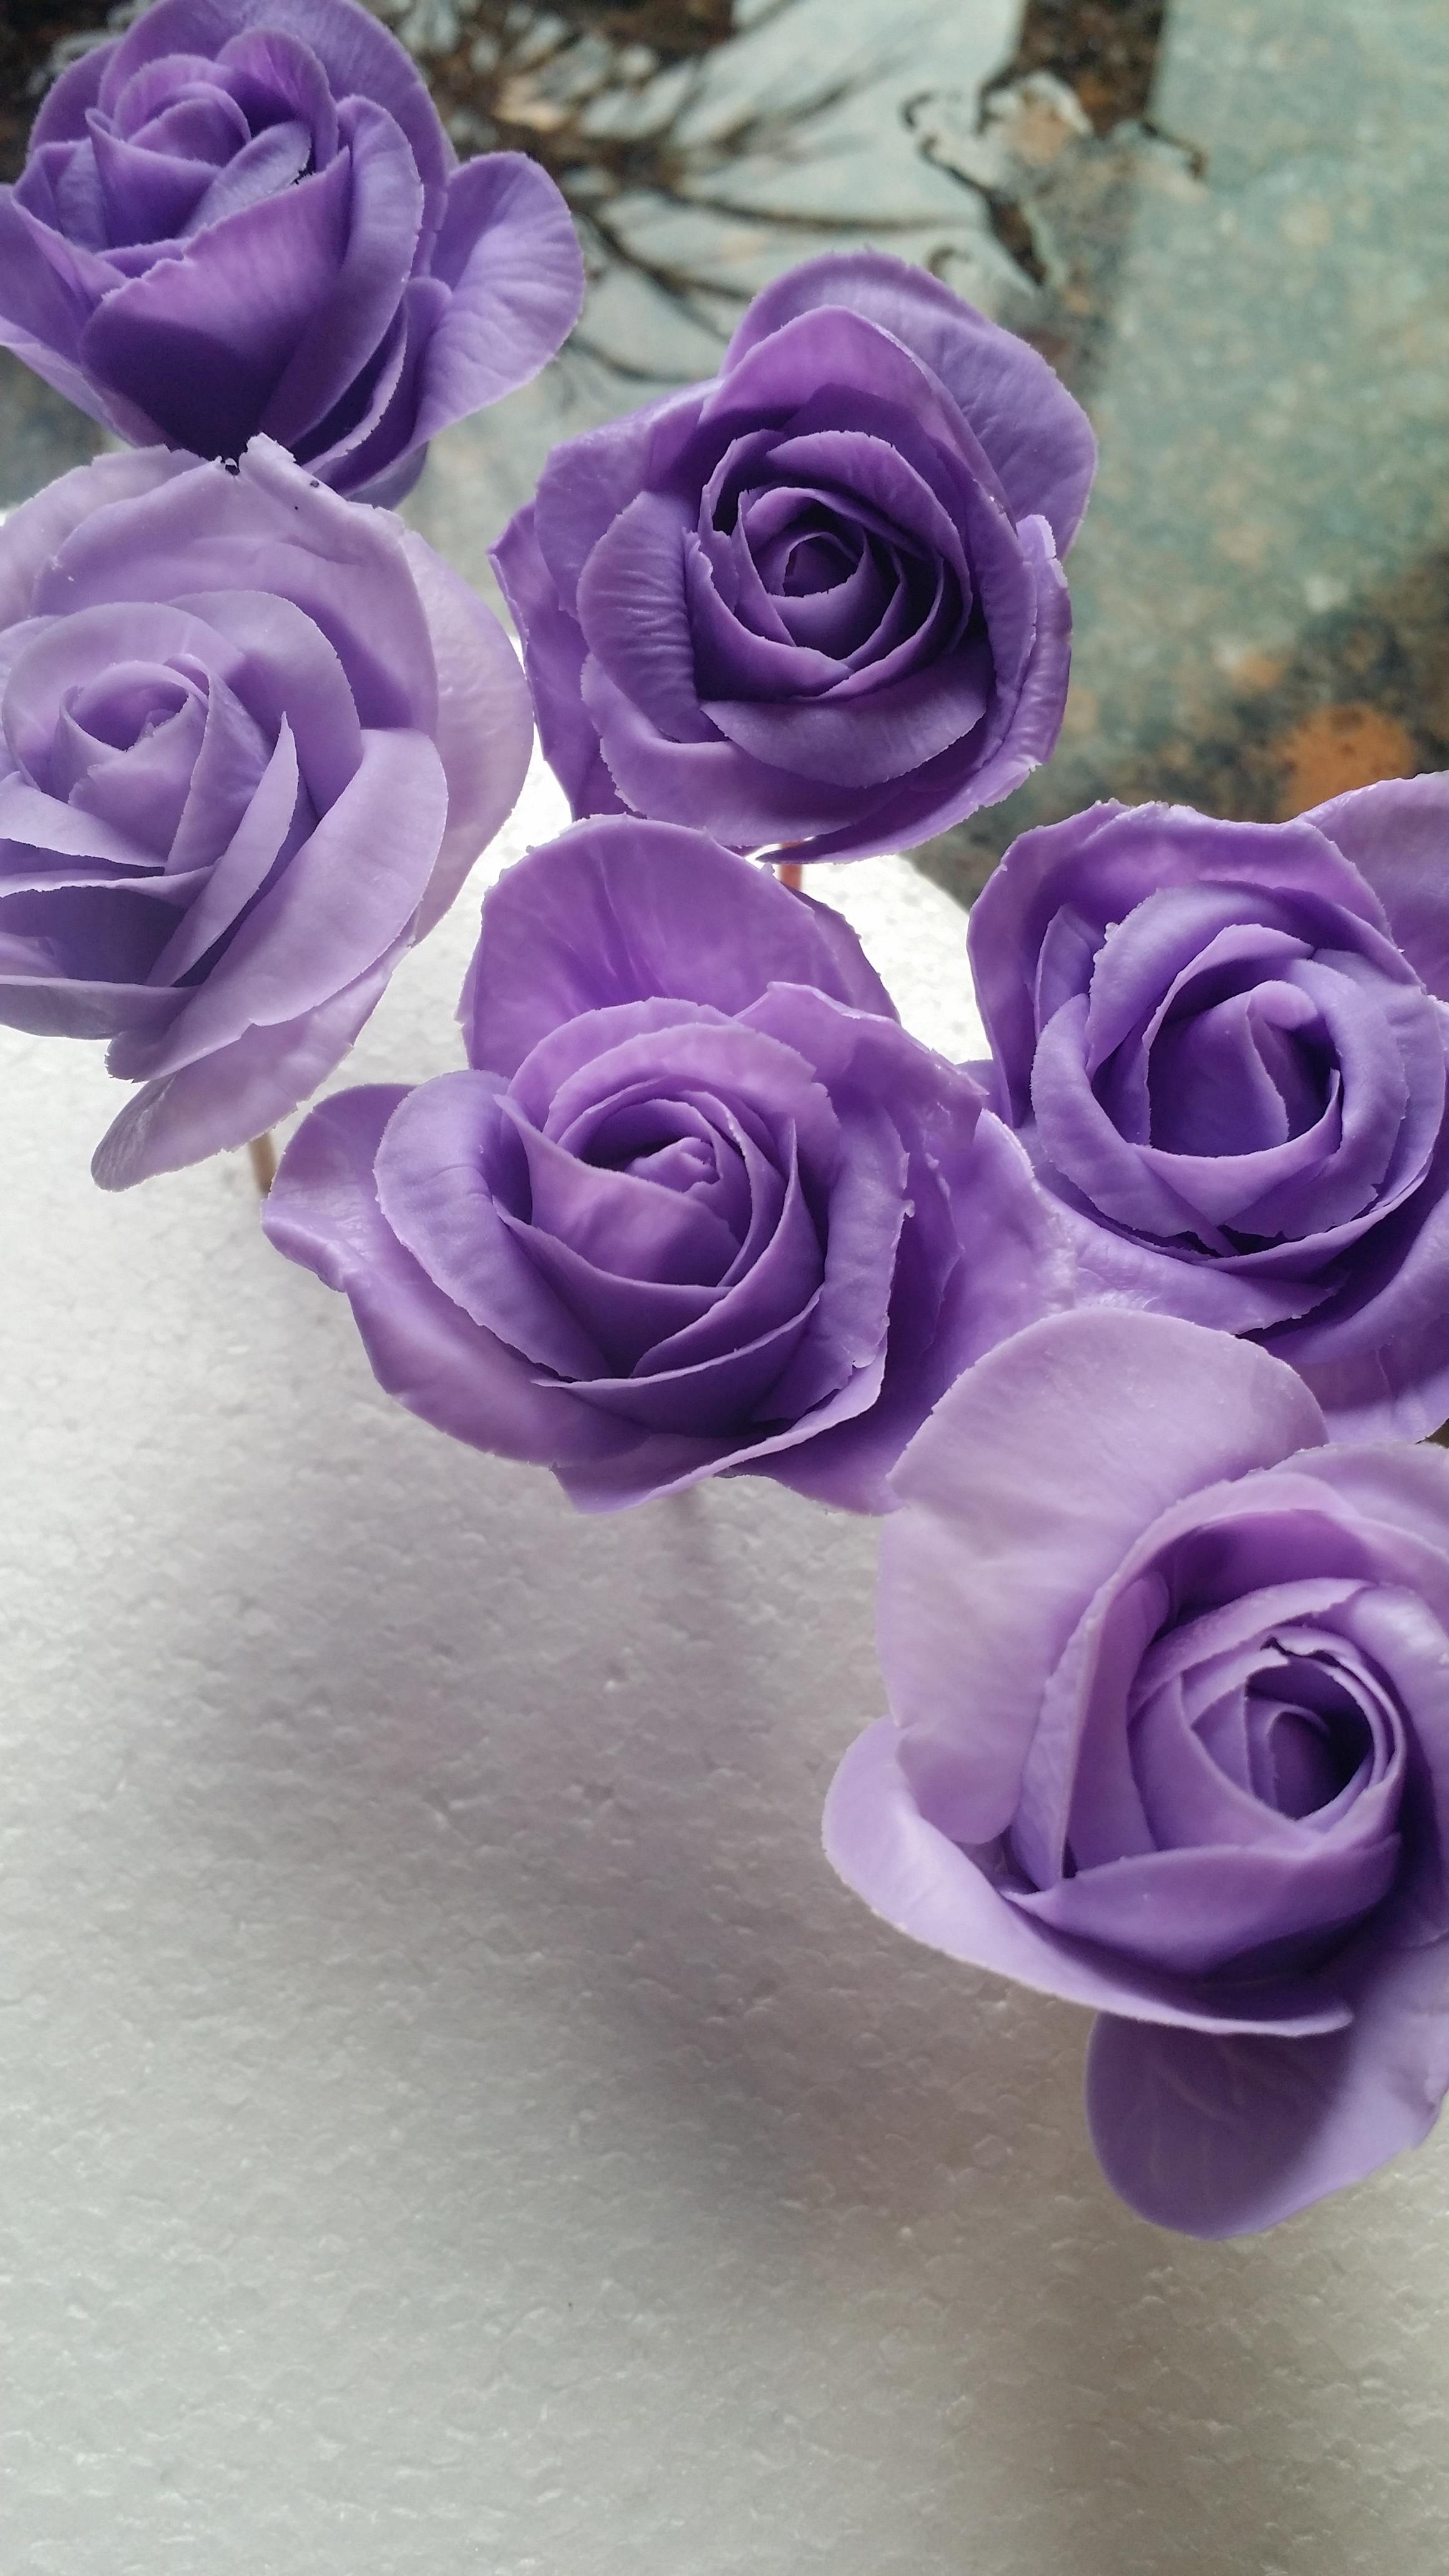
Next, on a hard flat surface, lay a piece of clear wrap down (so the wet (ish) petals don’t want to stick to your work surface). Hold the rose even (or a tad lower) with your flat work surface slide it into the purple covered Styrofoam. You want to barely squish the bottom petals against the work surface. Insert the flowers this way all the way around the tier until the bottom row is complete. Then set something heavy on the top of the tier. You want that bottom row to be firmly against the flat surface until it is mostly dry and will hold its flat bottomed shape.
Once the roses hold that flat bottomed shape, flip it over and repeat the process. Then again put something heavy over the top so that side will have a flat edge as well. It should look something like this:

The reason I did it this way was to minimize the gaps (you can move the petals around a bit at this stage of the drying) and to prepare it to be on or under cake! They do dry pretty firm and the petals are sharp enough where it would pierce through the fondant and look sunken in, instead of pressed up against! Once you have all your flowers done set these aside until you are ready to assemble the cake. i
Next it was time for some fondant painting!
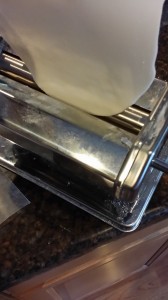
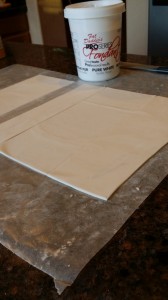
I ran the Fat Daddios Fondant through my pasta roller so it would be a uniform thickness. I liked this to be on the thicker side.
I made sure they were at least 4 inches wide by 12 inches long. The strips needed to be 1 inch by about 8 inches and I needed about 22 so I was making them wide enough to cut several strips from one piece. I also made them a little on the longer side, because I would rather cut them down then have them be too short! Then lay these pieces on a piece of wax paper.
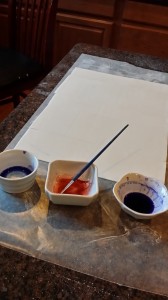
Next I got my “paints” ready. To make the Edible Paint I used icing color and vodka so it would dry fast. I made purple, red and blue so that I could make this several shades of purple. I mixed it to be very runny since I wanted a water color effect!
Next just dab it on! One color at a time!

Just keep going! I did all of one color then moved on to the next color so that it looked cohesive.
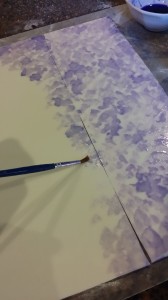
Then I mixed a new color of purple by adding a bit of pink and added it into the blank, white spaces.
Then mixed a blueish colored Purple and did it again.
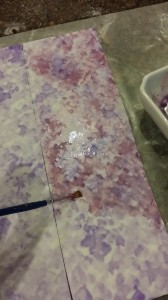
Now it is time to let them completely dry. Do not try and cut these while they are still even a little wet…again ask me how I know:)
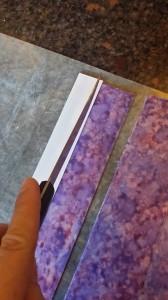
Once it is dry (at least over night) take a 1 inch template and place it on top of the painted piece and cut it down I just took a strip of card-stock paper and cut it to the size I needed as a guide.
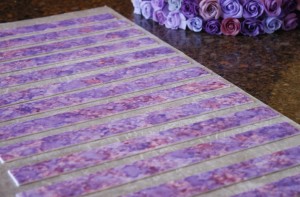
Once you have them all cut, set them aside, COVERED. Purple likes to fade to blue if it is exposed to light for too long, (another ask me how I know brought to you by yours truly;)! So cover it so that doesn’t happen. I love all the different purples in these strips and in the roses!
Since we have 3 faux tiers in this wedding cake to add all that extra height without adding all that unnecessary cake, I was able to make those up a head of time too!
To prep for these tiers I needed to make a batch of SugarVeil Icing and make about 6-7 sheets of the Circle Bouquet Mat just to be safe! Luckily this mat has just about the shortest drying time!! It is the most fragile so that is why I wanted to plan for more sheets then I needed.
I started by spreading SugarVeil Icing generously over the Circle Bouquet Mat
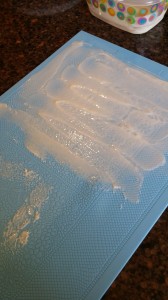
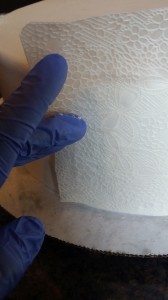
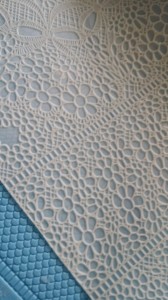
Next with the SugarVeil Scraper I made several passes over the mat to ensure I got the SugarVeil Icing into all the crevices. Since this was a white on white cake I was able to give this a bit of a thicker coat of Sugarveil Icing. This made the Sugarveil stronger, less fragile, and easier to handle by having an ever so light coat of icing over all the lacey holes. This thin white background behind the lace will be camouflaged up against the white fondant. I also wasn’t too concerned about the edges since I will cut those off and just use the center pattern.
This will dry in a couple of hours or in just a couple minutes (3 minutes at 200 degrees) in the oven! ..Guess which one I chose;)!! I made 7 of these sheets and put them into a plastic bag with parchment between them till I was ready to apply them.
Next coat the tier in a light coat of Crisco so the fondant adheres well. I covered the smallest dummy with Fat Daddios White Fondant and then over laid one of the dried sheet of trimmed Sugarveil Icing. Using just a bit of water will secure the lace to the fondant. I have a spray bottle that I lightly mist the back of the icing sheet with before I adhere it to the cake (…or dummy cake in this situation).
Once the Sugarveil Icing was on the cake I added the Monogram “G’. Next I painted a circle of corn syrup and poured on some of the extra Silver Dragees in varying sizes. Next I cut a length of the Faux diamond ribbon and added it around the top with a little corn syrup as “glue.” It stuck pretty well, the strand is pretty light weight but it gives you trouble by sliding, take a few corsage pins and use them to hold it up till it drys! Next I cut a length of the hand adorned faux diamond ribbon with the silver dragees attached and “glued” it down to the bottom edge. This was the first time I could see the ribbon up against the cake and I loved it!!
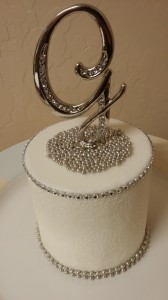
One Tier DONE!!
Next I did the the 6 X 4 Dallas Foam Cake Dummy. Coat the tier in a light coat of Crisco so the fondant adheres well. I covered it in Fat Daddios White Fondant. This tier will have a quilt pattern with the silver dragees in the cross sections. In the past, I measured around the tier and plotted the points to be perfectly even spaced around the tier, but that takes a LONG time and I found a handy little quilt imprinting wheel for under $10 so I figured I would give it a try!! Wow! What a time saver!! I just had the imprinting portion not a handle (I guess they are sold separate) so it was a little tricky to hold it even, and turn the cake stand. Then it didn’t match up perfect like if I were to do it by hand, but that is why cakes have a “Back Side” so I wasn’t going to stress about the tiny imperfection in the back!
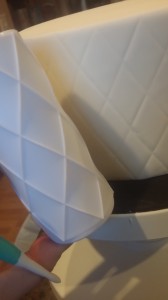
I just pressed very lightly, just enough to be able to trace the lines with my sewing tracing wheel!
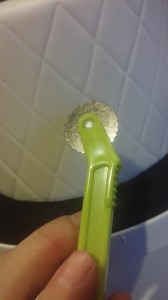
Next I went over all the cross lines with this tool and “+” I feel like it gives a little more texture to the quilt pattern!
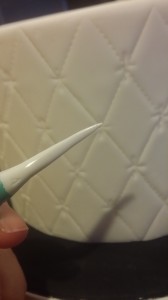
Next, I dabbed the Corn Syrup where the silver dragees were going and pushed them into the fondant.
Here is what I got so far! …coming along!!
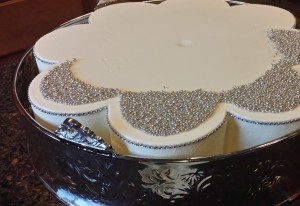
Now all that is left (for Dummy Cakes) is the large base of the cake, the petal tier. Coat the petal tier in a light coat of Crisco so the fondant adheres well. The easiest way to cover this odd shape with fondant was going to be to panel it on. I started with the top. I rolled out a large piece that would cover the entire top.
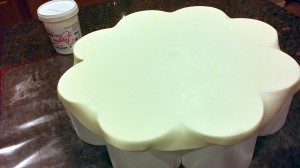
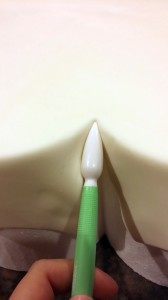
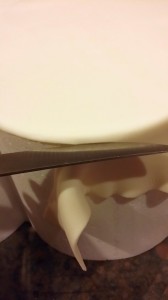
Next I took a pair of kitchen scissors and cut into the points so the fondant would lay flat.

Next I pushed that point in and down with this blunt pointed tool.
Here is what it looked like after that step.
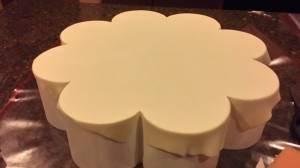
Next I trimmed off all the excess off the side, right up to the top.
Next I took pieces of the fondant and ran it through the pasta machine.

Then attached it to the side (make sure there is a thin layer of Crisco on the Styrofoam)
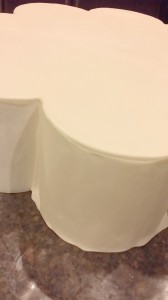
Smooth it on as best as you can, but you don’t need to get too carried away! The sides will be covered in the dried SugarVeil Icing Sheets and that stuff is amazing at hiding any fondant blemishes or seems!
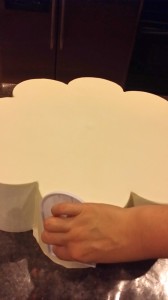
I trimmed the SugarVeil Sheet down to just the center design and then lightly misted the back with a little water and placed it on the outside of each of the petals.
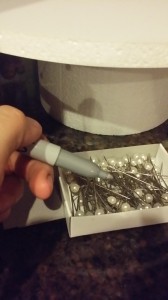
Sorry about the off colors on some of these photos, like most home bakers I get the most done at night when the lighting is awful!! Next I cut a length of the faux diamond ribbon to the length of each petal. This eliminated weight and and kept a tighter fit around the top edge. I used a bit of corn syrup to adhere it to the top edge and covering over any seem (from the SugarVeil or the fondant). If you find that is slides these corsage pins will hold it in place until it dries.
Next I cut a length of the faux diamond / Silver Dragee ribbon to the length of each petal and added corn syrup to the back side
and then adhered it to the base of each petal on the tier.
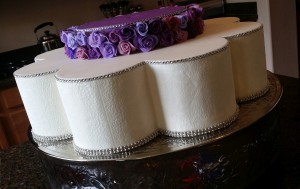
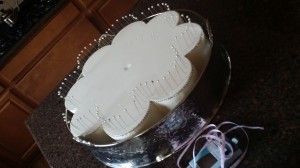
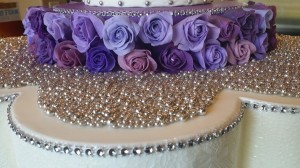
Here is what this tier looks like with the flowers on top:)!!
Once I had this cake put together I thought it needed a little more, so I added all the leftover Silver Dragees to the base of the petal tier! Since this is the bottom tier and you will be able to see it well I didnt just want to pour dragess on haphazardly;)!! So I got my measuring tape and those corsage pins again (thankfully there was 144 corsage pins in the box!) and went around the petal tier.
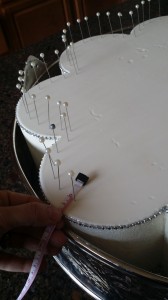
I went all the way around and then pulled them out;)!! I just wanted the dotted guide line! I also set up the petal tier inside the cake stand so that any loose dragees wouldn’t fall on my floor;)!
Next I painted on more “glue” (corn syrup) from the top of the petal all the way to the edge where the dotted line from the pin marks were!
Next I just dropped the dragees onto the cake! One Size at a time… 5mm
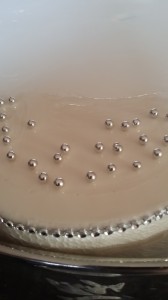
4mm…
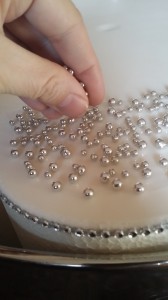
and filled in with the 3mm…
Until I was all the way around! Much better, I love how they just sparkle!
Now the rest goes pretty fast! It is “Real Cake Time” and most of the time consuming decorations are DONE!! I have also practiced 2 of the 3 designs for these 3 tiers on the “dummy cakes” so I am ready to go!!
A friend of mine in cake land is always talking about decorating your cake boards, you know who you are;)! So these next 2 pictures are for you<3!
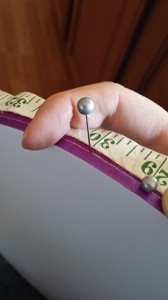
For this cake I will be putting it on a cake stand, but the first tier of “real cake” will be sitting on a somewhat hidden 1/2 inch thick, 10 inch in diameter cake board. So I will need just something around the outer edge to hid the styrofoam. I found a two tone purple string at the craft store and it already had a decorative mid line. I thought it would be great to have silver incorporated here as well. So I took those corsage pins, and since they were white, I took my silver Sharpie and colored them:)!!
Then with my measuring tape I spaced each corsage pin an inch apart and pushed them right through the mid line.
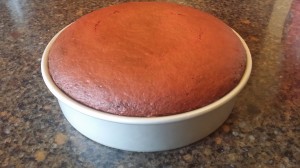
Now I was ready to bake!! For my first wedding cake I broke down and bought all new cake pans!! I picked up 2 of each even size of the Fat Daddios Round Cake Pans from our local cake supply store and I couldn’t be happier! It is nothing like the little thin one I had from Wal-mart that was dented in the bottom;)!! So I got the baking part done rather quickly! I have a confection oven so I can bake a few at once which is nice!
For my cake recipe I use a “Doctored” cake mix! The bride asked for Red Velvet so of course I bought several Red Velvet mixes! So per box of cake mix this how I made the cake.
- 1 Red Velvet Cake Mix
- 1 box white chocolate pudding (or cheese cake pudding if you can’t find white chocolate)
- 4 eggs
- 1/2 cup sour cream
- 1/2 cup buttermilk
- 1/3 cup vegetable oil
- 1 tsp vanilla
- 1 stick of butter
- 1 8oz package of cream cheese
- 3 cups of powder sugar
- 1 TBS vanilla
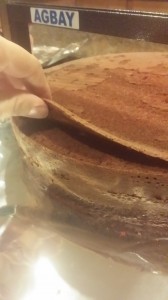
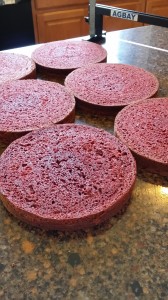
Next I trimmed both top and bottom of all the cakes with my Agbay Jr Cake Leveler. Then sliced them into about 1 inch slices! The best part about Red Velvet (In my opinion) is all the cream cheese frosting, so I wanted as many layers as possible 🙂
Next I put a thin coating of frosting on my cake boards to get ready to build my tiers!

Once I had the 12′” and the 10″ cake tiers built, I coated these a little different! Instead of crumb coating I decided to “Cake Spackle” them! I had heard of this before from CakeFu, but when Sugar Sugar recommended this method for extra stability I thought with the size of the cake, that it would be a good idea. Basically “Cake Spackle” is made the same way as cake pops!! Mix cake crumbs (all those tops and bottoms I cut off with the Agbay) and frosting together until it is a spreadable consistency. *Tip* crumb the cakes in a food processor so the crumb is very fine and not lumpy!
So I did a light coat of cake spackle all around and on the top of the cake. Next I cut a piece of wax paper for the top (make sure it doesn’t completely cover the top) then stick a cardboard cake circle on top of the waxpaper.
Next start packing the mixture between the two cake boards.
Then take your cake scraper and go around the edge getting all the excess off. (this is where it is helpful to have broken down the cake into a small crumb when making the Cake Spackle)
Now for the Tall mid tier… Same thing, cut all the layers with the Agbay Jr. Pictures like this, is excatly why I <3 my Agbay!! I could have never done that with a normal knife!!
Start Stacking and layering frosting! When you get to 4 inches stop and put dowel supports in the tier.
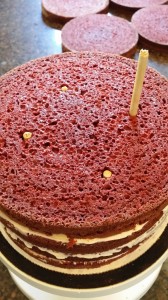
You will be basically stacking 2, 4 inch cakes on top of one another so then put the new cake cardboard circle on top of the first 4 inches of supported cake and start stacking and layering icing again to another 4 inches. We are looking for 8 inches total.

Then support it again with dowels! You can never put too many supports a wedding cake!
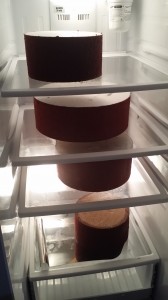
Once you have gotten this far it is a good idea to let them sit in the fridge for a bit to firm up! I have the 12 inch tier and 10 inch tier that have been cake Spackled The tall tier in there to firm up for the “Cake Spackle.” I let that tier sit in the fridge while I thought about how I was going to tackle this tier;)!!
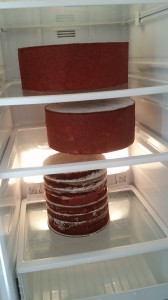
I tried to Spackle the cake as a tall tier, that was NOT a good idea!! Beginners like me should not do it this way;)! The better way was to Spackle it as 2 individual 4 inch tiers and then back in the fridge to firm up while I ganached the other 2 tiers! I have the tall tier split up now in the fridge, one on the top shelf and one on the bottom.
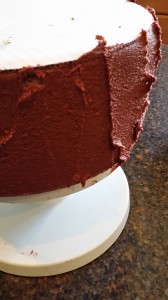
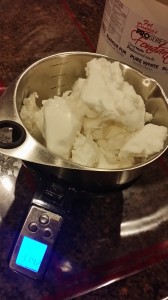
Chocolate Ganache:
The ratio for chocolate ganache under your fondant is going to depend on your chocolate! I used chocolate chips. Semi-sweet and milk chocolate mixed together. I made a 3-1 ratio, (3 parts chocolate/1 part heavy cream). I boiled the cream, poured over the chocolate chips, let it rest for about 3 minutes and then whisked the mixture until it was smooth. Then I let this sit over night.
It was runny, even after sitting overnight! So… I added more chocolate;)!! It ended up needing to be 2-1 ratio to set up well for the kind of chocolate I was using. So use a chocolate you would like to eat and mix it with heavy cream. I would start with 2 parts chocolate, 1 part cream and then if you need more cream, add it in later (its cheaper then buying a hole lot more chocolate – just warm up the chocolate ganache again and add warm cream and whisk it until it is smooth again if you want to alter it later)
Next it is time for the Acrylic Disks!! This is one of my favorite parts!! This makes it so easy and the results are flawless! Take off the top cardboard cake circle. Put a dollop of ganache on the top and spread it as level as possible. Then cut another circle of wax paper just inside the acrylic circle (the goal is to cover most of the surface while still having enough ganache outside the wax paper to stick to the Acrylic Disks. Once the top is one, flip it upside down and put the bottom piece on. Then you can start filling the empty space with ganache.
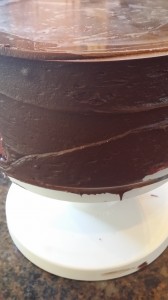
You want enough ganache that you can scrape away the excess and it will leave it smooth!
Go around filling “holes” until you have a super smooth surface like this:
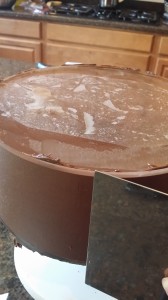
Once the ganache has set, slide in a pallet knife or your angled spatula between the ganache and the Acrylic Discs. Peel off the wax paper and fill any imperfections with the soft ganache. If you set the tier in the fridge to firm up like I did, the top will firm up fast with the small bits from filling imperfections.
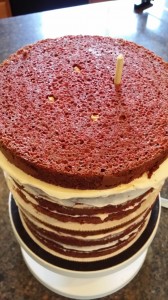
Now for the Tall Tier!! This one was a little tricky but turned out beautiful! What I ended up doing was stacking those two, 4 inch high 8 inch cakes right on top of each other with all the cardboard cake circles attached, minus the very top one. I secured the two together with a little ganache in between the two cake boards to secure them together.
*Confused about leaving all that cardboard? When the cake is cut into at the wedding, the chef will cut down till he hits the mid board and then he will know where the top of the next cake starts and will cut around to separate them!
Once I had the two cakes on top of each other I put 3 skewers all the way through the tall cake to keep them from sliding (around the edge) Then it was business as usual! I put the Acrylic Discs on top and bottom in the same way and filled it fill of ganache and scraped away the excess.
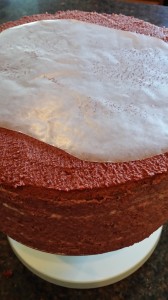
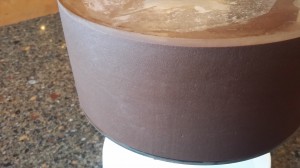
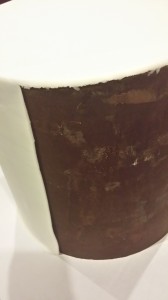
Covering the 2 normal 4 inch high tiers was just the same as covering the dummy cakes! I measured out the amount of fondant I needed. I added just a bit of Crisco to the outside and laid the Fondant over the cakes and smoothed them down.
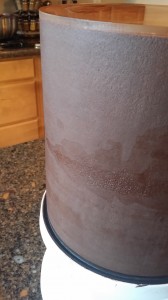
The tall cake… that takes a different kind of skill and patients!! I couldn’t do it without the fondant tearing. I tried, but could not get it!! I had never even attempted a tall tier before so a couple days before the wedding was probably not the best time to start;)! After the fondant teared at the top edge of the cake leaving just the top covered nicely and the sides torn off, and after freaking out just a bit, I decided to panel the fondant on like I did the petal tier and then put the hand painted stripes over the seems. EASY!! I used the pasta machine again to make strips to go around the cake.
and then cut even panels and attached it to the top and adhered it to the sides!
Once I got all the fondant all the way around the tall tier I used a bit more corn syrup to stick the decorated pieces of fondant on to the tier. Making sure to cover the seems from paneling the fondant!
The other two tiers of real cake were done just like the two dummy tiers! One was SugarVeil Icing and the other was the quilt pattern with the Silver Dragees! But before we finish by showing you this cake, we are the developers of the Easy Roller so we cannot show up to any event without matching cake pops of course!!
With all this time spent on the cake, I needed to make the cake pops fast and easy!! So what I did was pre-make 150 ribbon roses from Royal Icing in 3 different purples! With Icing Tip #15 just go around in a tight circle! Then with a small leaf tip like this #65 an even burst will give you the leaf!
Once they are dry just peel off the wax paper and they are ready to pop on the top of your cake pops!
To make the cake pops
Take your baked cake and knead it down to a doughy consistency. We do this in the food processor, because its FAST! You can add frosting/jam/coffee creamer WHATEVER to add a little extra flavor, or nothing at all! Just mix the cake till it is pliable and start rolling the dough into balls. We do this step in the Easy Roller, so we can roll 21 of these at a time:) Or the Mini Roller if you don’t need as many;)! Take a look!
Once all the cake balls are rolled, dip the stick into melted white chocolate candy wafers and then place the stick into the cake ball. Next submerge the entire pop into the white chocolate candy melts and tap off the excess. Place them in your favorite cake pop stand to dry, but before this chocolate sets take the dry Royal Icing flower and place it in the cake pop’s outer shell. We also added the silver sugar just to tie in the wedding colors! That is it! If you use the Easy Roller, the hardest part will be waiting for the Flowers to dry:)!!


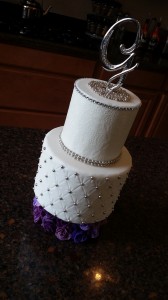
Alright, here it is on the kitchen counter!! …I had to stand on my counter to get this put together!!

For wedding cake #3 it turned out better then imagined! I was so excited I showed all my friends and family:)!! They ALL asked me the the same thing, LOL! They said; Wow Jennifer that is beautiful but how they heck are you going to get it to the wedding!!? I told them the CakeSafe of course!! I got my Medium/Tall CakeSafe with THIS cake in mind! I knew I wanted to make this tall cake so when I ordered it last year I made sure it was going to fit a tall cake:)!! What is a CakeSafe? It is basically a travel container for your cakes! Once the cake is in there you really don’t have to worry about it! This is how it works You place your cake on the base, put the sides up

Then the final side! The only thing not in here is the top two tiers, the dummy tiers! They are super light, easy to move and will cover the small hole that secures the cake in the CakeSafe!

Secure the lid and push the center rod all the way through the cake! This was the reason when I doweled my cake (the supports) I didn’t put any right through the center! You want to have a clear path for this rod! Any board thinker then cardboard you want to have pre-drilled (Which is why I ordered my Dallas Foam all pre-drilled) I assembled the CakeSafe on the dolly so I could easily get it to the car!

You will see at the bottom of the CakeSafe the rod made it all the way through to the bottom and is secure! I can now tip this thing on a 45 degree angle and not ruin the cake! Can you believe it!! CakeSafe just takes all the stress out of cake delivery!

Make sure the back of your car will fit the CakeSafe you want! This one fits perfect!!

Look at that!! It traveled an hour in the car, making turns, on the freeways, on the surface streets and I didn’t worry about it at all! 
Look at that!!! At the Wedding Venue! It made it with no trouble thanks to the CakeSafe!! I was now able to relax and enjoy the wedding:)!!


(*Image by Brittany Janelle Photography)


I think they look pretty happy<3!

(*Image by Brittany Janelle Photography)
I even got a slice 🙂

If you like the tutorial don’t forget to check out and share our Easy Roller or New Mini Easy Roller with your co-workers, friends & Family! It is how we keep these tutorials coming:)!