
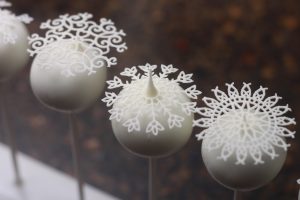
These “Floating” Snowflake Cake Pops were so easy and fun to make!
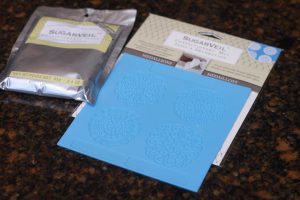
Have you heard of SugarVeil® Icing? If not, it’s about the coolest thing ever, right next to my Easy Roller of course;)! There are so many things that you can do using it. What is SugarVeil® Icing you ask? SugarVeil®, the original edible lace product. It was invented by Michele Hester more than 16 years ago!! It’s a great-tasting product without chemical additives or preservatives that, when mixed with water can be spread onto a Lace mat or just piped onto any edible project (cake pops included)! When you pipe your SugarVeil® you can do it directly on your work surface, OR you can pipe it on to parchment paper and peel it off and apply it after it dries, it bends and twists so you don’t have to be limited to just flat forms:)!! Now where do you get it?? Micheal’s Craft Store!! They carry the whole line!
Today I thought I would share these Winter Wonderland, Snowy Cake Pops. I’ll show you just how easy they are to make with SugarVeil Icing®, and the “Medallions Mat!” Both of which you can get from your local Michael’s Craft Store!
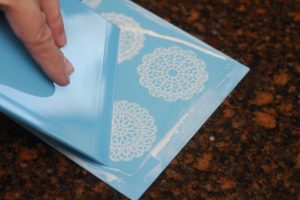
Mix the SugarVeil® with water. Just follow the directions on the back of the icing packet!
I always start by putting a dollop of SugarVeil Icing® on the mat, and with the spreader, push the SugarVeil® into the Medallions Mat. Make sure to swipe over it a few times for even coverage! When you have it completely covered, wipe the spreader clean and take one final pass over the mat. This makes sure all the intended open areas are open:)
You can let these cure overnight, or if you are in a hurry, just follow the oven instructions and they will be done in just a few minutes!
When the SugarVeil Icing® is dry to the touch and pulls away easily. Flip the mat over and un-mold it and cut out a few sections to make them look more like snowflakes, and lay them on a flat surface to completely dry flat! Take a look here:
While these are drying out to hold the shape, it’s time to make cake pops!
Bake your favorite cake recipe. If you are just making cake pops, one box of cake will make about 30 cake pops with the Easy Roller. All 1.25 inches in diameter. Think ping pong ball size once they are dipped. You can also take all the tops from a decorated cake, yesterday’s cupcakes, or even a store bought cake! Just crumble and knead it down until it is a pliable dough. Just like the consistency of Play-Doh! You can do it by hand (you also will need a bit of frosting this way). However I have found, it’s so much faster if you just put your cake into the mixer or food processor and leave it in there until it turns to dough. If you are mixing the cake this way, you only need frosting if you want to add some extra sweetness or a special flavor.
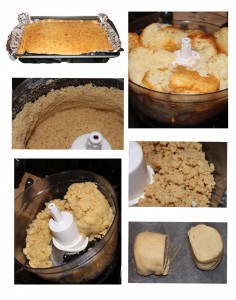
Next take that dough and roll them into balls. We do this step with the help of the Easy Roller! It can roll an entire cake in no time at all, since it rolls 21 cake balls at one time & they are all the same size! Here is how it works if you haven’t seen or heard of it yet!
…if you don’t make cake pops often but you still would like to make them faster our newest “Mini” Easy Roller is now available! It rolls 9 at a time!
Once all your cake is rolled into balls dip them into melted candy melts (place the candy melts in a microwave safe container and place it into the microwave on 50% power (or defrost) for 1 minute, take it out of the microwave and stir. Put the bowl back in the microwave at 50% power, in 30 second increments until fluid)!
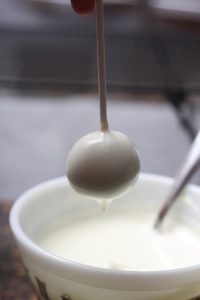
Don’t tap off much of excess chocolate for these cake pops. You want the chocolate to set, while they are hanging upside down, dripping. Just have some wax paper under them for easy clean up. This will allow them to harden with a chocolate tip at the top. How do you do this without holding each one for 5-10 minutes?! I put the cake pop stick through the underside of my cooling rack. You know, up through one of those little squares and used a binder clip to hold the stick.
This works because the binder clip won’t fit through the cooling rack squares. They stay suspended and the excess can drip and harden without having to hold each one!
Once they have hardened, you can pull them from the rack and slide your SugarVeil Icing® Snowflake right over that point, that’s it!! The hardest part to decorating these snowflake cake pops, is just securing them to a rack to set;)!!
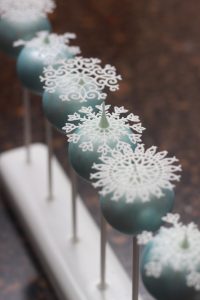
You can also use a little pearl dust and dry dust the cake pops to give them a little different look! Here they are in a pearlescent blue!

If you liked this post, share it & the Easy Rollers with your friends and family (…It is baking season!!), it is how we keep them coming 🙂