
Have you ever thought about making zoo themed cake pops? Maybe some animal characters? But then thought that would take too long! So what could you make that would still be a fun zoo theme but not take all day:)?? Let’s make Fast Easy (of course) “Zebra Tails”! “AKA” marble cake pops!!


Have you ever made “marbled cake pops”? I made my first batch of them a few years ago and the technique went viral! Here is a sneak peak at my very first marble or “tie – dyed piece” cake pops! 

As you can see, this marbled technique can be used for various different themes, so when I was thinking of possible fun zoo themed pops, “Zebra Tails” were born !
Start by baking a cake …I use the boxed variety;) and make your cake pop dough, this is how I do it in case you were wondering! Then we use our The Easy Roller or NEW Mini Easy Roller (at a fraction of the price) to roll perfect cake balls, this amazing tool will give you fast, consistent results every time. For the “Zebra Tail’s” I will start with just a basic ball shape. So I will use my Easy Roller to make all the cake dough into 1.25? rounds. Of course you can do this part by hand, it just takes longer – and the fun part is decorating!
Once you have all your cake balls ready, start warming up your candy melts! I used milk chocolate in a bowl and white chocolate in a sandwich bag with a little bigger of an opening at the tip! You will want a lot to come out fast for these! Also have an empty dish and some cake pop sticks ready to go as well! I find if you dye the chocolate black it has a little bit of a funny “dye” taste to it! So I settle for brown and white Zebra Tails so I don’t sacrifice taste, because lets face it, taste comes first!

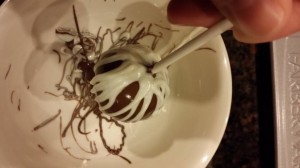
I have seen other tutorials on how to make marbled cake pops, but none quite as easy as the way I do it:)!! So to achieve this zebra tail or marbled cake pop, the Easy way, take the cake pop stick, dip it into the chocolate, then into your cake ball. Now take that cake ball and dunk it into the chocolate melts. Make sure to have as much chocolate on the pop as you possibly can! No tapping!! Now quickly take it over to you empty, clean bowl and start piping on thick stripes back and forth on the pop and twist it as you go, so the white will go all the way around the pop! (If you want to do more colors for marbled pops, just keep going and add all the colors in the same fashion) You should now have tons of candy melts on this one pop!! For now it should look Like this:

Now that you have tons of chocolate on here it should want to fall off pretty easy!! Just hold it upside down and carefully wiggle it till most of it falls off!

What happens is all that chocolate will flatten out around the cake pop and start twisting around itself to a pretty cool effect! When all the excess is off, give it a little twist as you turn it right side up and that will give you the “tail”! Then set it in your cake pop stand to harden:

Keep on going till you have all your cake pops done and ready to go!! These cake pop stands also make great displays when at an event! Check out the desert table!


Hope you liked our Zebra Tails! Let us know if you give it a try!! Also don’t forget to Check out our Easy Roller or New Mini Easy Roller! It is how we keep these tutorials coming:)!!