
I see a lot of cake pop eyeballs around Halloween and they are all usually about the same, so I wanted to give these cake pops a new twist! Try these out, they were fun, easy and will definitely impress…and didn’t take too long either!
Supply List!
- Cake balls – Cake Mix, Eggs, Oil, Water – or your favorite scratch recipe.
- White Candy Melts
- LifeSaver Gummies
- Black Sixlets
- Candy melts to accent your Eyes (green, brown, blue, red – your choice! I used brown)
- Red Candy Melts or Red Royal Icing
Once you have all your cake balls rolled, cover them and stick them into the fridge while you work on the next step! The Eye’s Iris and Pupil!
For these I took a Black Sixlets and pushed it through the Lifesaver Gummy hole! Make sure as you are assembling the gummies and Sixlets the “right side” of the Lifesaver Gummies will be the side without the logo impression!

Once you have all your iris’s and pupils together (Lifesavers and Sixlets) warm up your candy melt color that is your Eye Accent color (milk chocolate in my case) and fill your sandwich bag! Snip the tip and pipe a dot nearest the black Sixlet by using pressure on the piping bag and then release the pressure while pulling out a “tail” with the candy melts! Take a look

and done here:

Now its time to dip your cake pops! I used a longer 6 inch paper stick for these! Dip all your cake balls in white candy melts. Tap off a bit of the excess. …don’t have to get too carried away on the tapping – if the candy melts run down the stick a bit, its OK, it will just add texture to your stick:)!!

Once it is dipped, place one of your candy eyes on top, when the candy melts set they will be firmly attached!

Now for the FUN PART!!! Get your Red Candy Melts or Red Royal Icing into your piping bag (sandwich bag)! I used Royal Icing for this step, but just because I had it on hand from some Fall Cookies I just made:)!! The Candy Melts will actually set faster and work in exactly the same way! The Royal Icing you may want to have set over night before you try to move them too much!
I used just a snipped a medium/small hole corner from my sandwich bag, but If I were guessing on a tip size (if you are lucky enough to have a stash of these around) I would start with a #3!
Start by piping a bit along the stick. Get messy! We are just adding some base texture! Twirl the stick, make some parts thicker then others if you like, it really doesn’t matter! Just make sure you leave yourself enough room to pick up the stick and put it back into your favorite cake pop stand to dry! See…

Once you have the red base down now (see if you had some white candy melts drip down your stick, it would just add more texture here!!) it is time to keep piping lines, swirls up the stick! If you are moving in an upward directon from the base of the stick (*TIP-leave room to handle the pop at the very base) to the cake pop you are doing good!

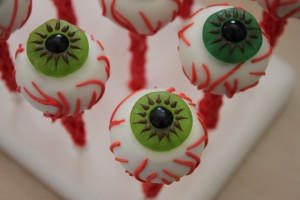
Once you like the look of the stick, go around one more time, this time bringing your line up to the white of the “eye.” Release pressure once you are about where you want to stop so it will taper off! I like to add one more line that branches off from that main “vein.”

You can even “branch off” a few times like this:

Once you have gone around the entire pop like this, you are done! Check ’em out!!


Not too difficult and with this one messy is good;)!! Get ready to add these to the Halloween Menu:)?!

If you like the tutorial don’t forget to check out & share our Easy Roller (or our new Mini Easy Roller!) with your friends! It is how we keep these tutorials coming:)!