

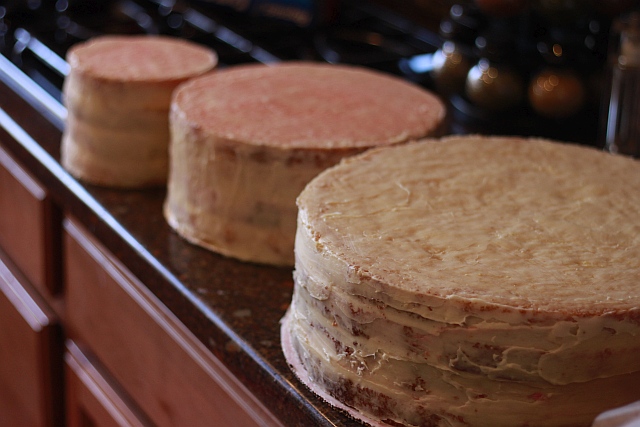
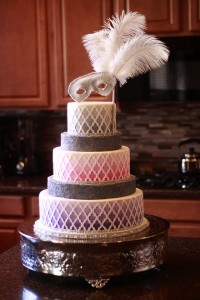
This is the Biggest Cake I have made to date! Not the Tallest Cake, but definitely the biggest 🙂 This cake was inspired by the dress of the birthday girl. I love how it turned out, and anyone with a little patience (and the right tools) can recreate it!
Of course I started by making a lot of cake 😉 I have 2 Fat Daddio’s pans in each size to help speed things up.

She wanted Strawberry and Lemon Cake. So to make the cakes, I just use a doctored cake mix. Instead of making the cake according to the box directions, I do this:
To one box of cake I add:
- 4 eggs
- 1 cup of milk
- 1/2 package of instant pudding mix
- 1/3 cup of oil
- 1/2 cup of Sour Cream
Then bake as directed. I do these same directions no matter the cake flavor.
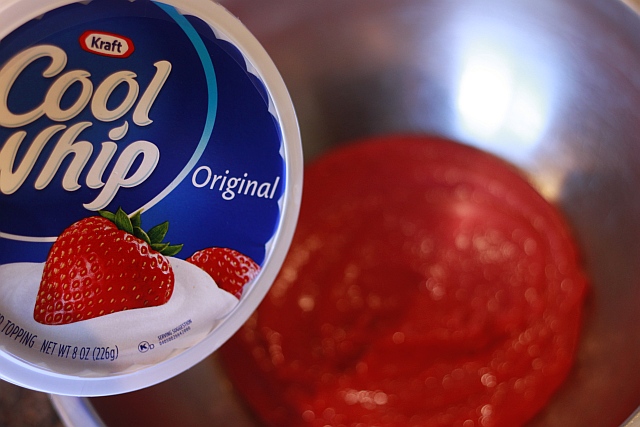
For the filling. This was strawberry mousse like filling. Strawberry & Raspberry Jelly mixed with Strawberry Jello and lemon pudding. I put about of cup of jelly into a bowl. Then made the jello as directed on the box only with half the amount of water. Once the jello was done heating I poured it into the jelly and mixed it until it was fully incorporated. Next I mixed the Pudding with half the amount of milk and then added that to the mixture and let it set until cooled. Now I just took equal parts of cool whip and this berry filling and mixed slowly with a whisk until incorporated. I put it back in the fridge until it was time to tort and fill the cakes.
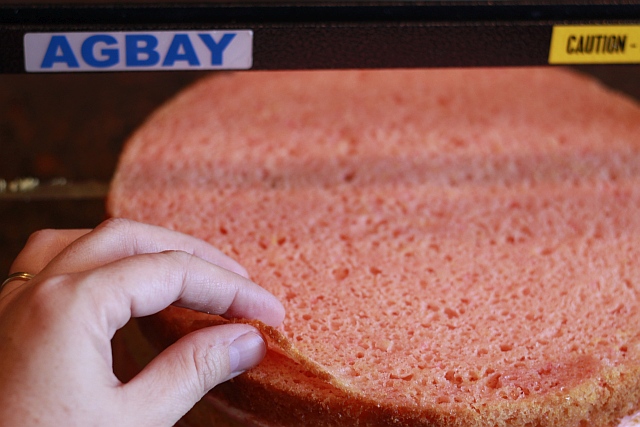
I always use the Agbay Jr to level and cut cakes. I have tried to do this step without the help of this amazing tool and let me just tell you, for your own sanity, get the Agbay, you won’t regret it! My only regret is not getting a bigger one;)! I cut the tops off all the cakes. Also about 1/8 of an inch off the bottom of the cakes (Since I can with this knife) to get rid of that tougher crust. Don’t worry, I don’t throw these out! Save it for Cake Pops!!
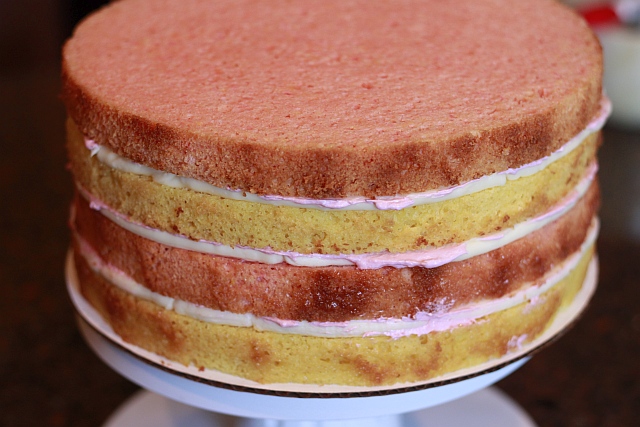
Then I made a dam with some Cream Cheese Frosting (My favorite). To make Cream Cheese Frosting, all you need is a little vanilla, a stick of butter (room temp), one package of cream cheese (room temp) and 3 cups of powdered sugar. Cream the butter and cream cheese in the mixer and then add the powder sugar and vanilla. Once it is all fully incorporated, put it into a piping bag, snip the tip and pipe a circle around the edge of the cake.

Now you have a perfectly yummy dam to hold in the berry filling.
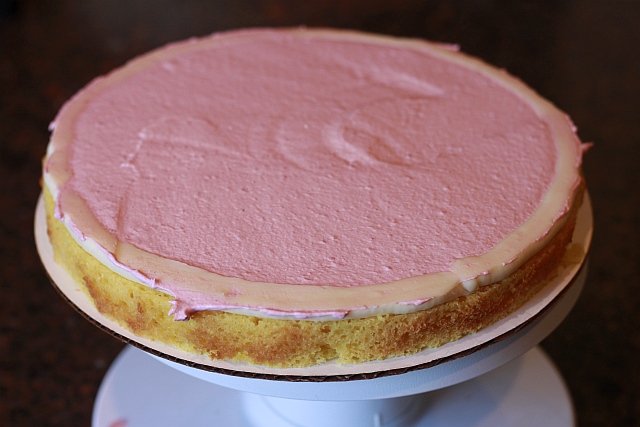
Then Repeat! Stack the cake and continue layering with the filling. I alternated lemon and strawberry cake layers 🙂
I put a light layer of white chocolate ganache on them to seal in all the crumbs.
Ganache Recipe:
- 3 parts chocolate (Use your favorite kind)
- 1 part cream
Then let it set on the counter until it is the consistency of peanut butter. Make the day before you are going to use it, this step takes a while to set!
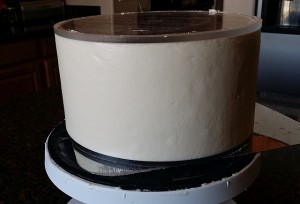
After the cakes have been crumb coated, it’s into the fridge to firm up!
I always coat the cakes in a layer of ganache so the sides look amazing!
To make covering the cake in ganache super simple, it’s all about the acrylic discs!! So easy! Put a dab of ganache on the bottom disc and attach it to the bottom cake circle. Then use a dab of ganache to attach a piece of parchment paper to the top disc (just make sure its about 1.5 inches smaller then the disk). Coat the top of the cake with ganache and put the disk right on top. Make sure the sides are straight, and the top is level. The disc’s need to match up on the top and bottom. Next go around and slather it in ganache. Take a scraper and with the scraper touching the top and bottom disk scrape away the excess chocolate. Let it set in the fridge.
To remove the disc’s take the bottom one off first. I use a piece of fishing string and wrap each end around a piece of a wooden dowel (it reminds of the cutter they use to cut clay!) and then place it inbetween the cake and the disc and wrap the string around and pull. It will pop right off. Then Repeat for the top! You might need to fill some minor imperfections with a bit of soft ganache but it is minimal and easy.
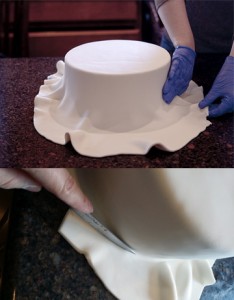
Next cover in Fondant. If you are not the best at covering cakes in fondant, this cake is for you! 🙂 Most of this layer will be hidden so don’t worry so much about small imperfections. Then trim the excess at the bottom.
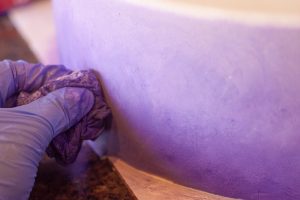
Next, Paint the fondant! You do this with food color of course! With a paper towel I dabbed on color, then turned the paper towel and wiped it off. I kept repeating this step until the desired ombre look was obtained (Lighter at the top, more color at the bottom). I painted each tier a different color. One purple, one pink and one silver (grey – with pearl dust brushed over)
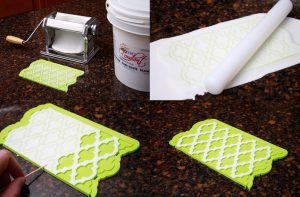
To make the pretty window effect, I used this Silicone Onlay. Run a piece of fondant through a pasta roller (if you have one) or roll it out with a rolling pin to just under the thickness of the design. Sprinkle a bit of cornstarch on the onlay and place the fondant right over it. Use your rolling pin to force the fondant into the only design. Stop rolling when you see the green lines come through the fondant. Next with a toothpick remove the scrap pieces of fondant. Spritz the cake with a bit of water and place the onlay up against the cake and peel it back slowly and watch it adhere beautifully and effortlessly adhere to the cake.
Once these tiers were done, I made some smaller 2 inch accent tiers. I frosted these with the remainder of the cream cheese frosting and rolled it in silver sprinkles! In hindsight I should have tinted the frosting grey so you wouldn’t see any white frosting show through! I used an airbrush and went over it with silver, but that was way more work than it needed to be;)!
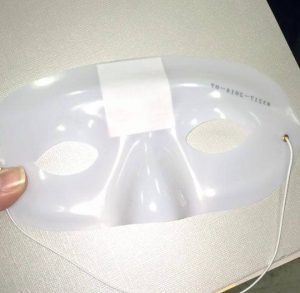
For the Mask on top, I used one of these as a template. I ran a peice of grey fondant through the pasta machine at the thickest setting and laid it on top of this mask. I trimmed around the edges and inside the eye holes.
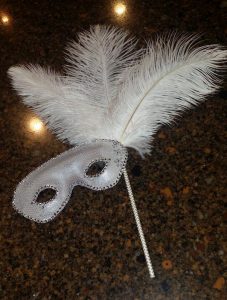
Once it dried hard I dusted it with silver pearl dust and coated it in SugarVeil Icing, using the SugarVeil Flower Net Mat. Around the edge I glued some “Bling Ribbon” and added a few ostrich feathers (gotta love Amazon!) I attached the mask to a chevron paper straw and sunk this right into the cake as the topper!
This is it! My Biggest Cake, the Masquerade Cake!
As always if you like these tutorials and want to see more please “like” and “share” our Easy Roller or New Mini Easy Roller with your co-workers, friends and family! It is how we keep them coming, it also means the WORLD to me:)!!