
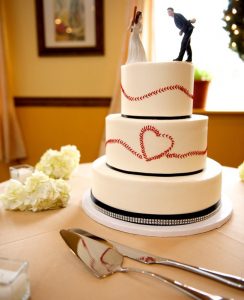
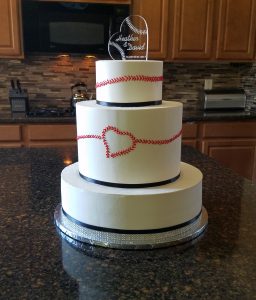
I was asked to recreate this baseball wedding cake & to add some matching cake pops! I was sent this Pinterest Image:
From the Pinterest album: Peter & Renee’s Baseball & Bling Wedding Lets take a look at how to do this Step by Step.
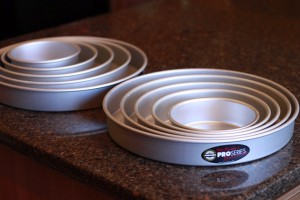
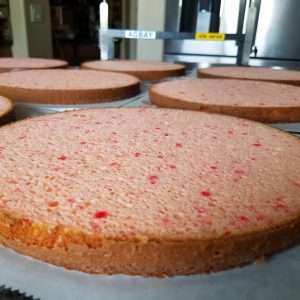
Of course I started by making a lot of cake! 😉 I have 2 Fat Daddio’s pans in each size to help speed things up.
Doctored Cake Mixes are my jam for my stacked wedding cakes to make them sturdy enough to stack.
To one box cake mix, I add the following:
- 4 eggs
- 1 cup of milk
- 1/2 package of instant pudding mix
- 1/3 cup of oil
- 1/2 cup of Sour Cream
For this cake, I needed to bake a lot of cakes! It was to serve 150 guests. To accommodate that many people, I made 3 tiers. The base was a 14″ round. Mid Teir was a 10″ double barrel. A Double barrel is when you stack 2 tiers and frost them as one. And finally the topper was a 6″ tier.
I had 2 wedding cakes to make for the same day! So to ensure I had enough time I baked enough cakes the week before for both jobs. When you “pre-bake” cakes like this it’s best to immediately pop them into the freezer after baking. On the Wednesday before the wedding, I put them in the refrigerator in order to thaw. While I prepped the ganache.
And it was A LOT of Ganache! I was using ganache to dam in the filling and cover each tier. The customer wanted Cream Cheese icing but there is no way it would have been as stable or pretty as ganache. Comprise? I decided to make a cream cheese flavored ganache! With 2 quarts Heavy Whipping Cream, 12.5 pounds of white chocolate, and 6 tsp of Lorann Oils Super Strength Cream Cheese Icing Flavor I made some pretty awesome ganache!
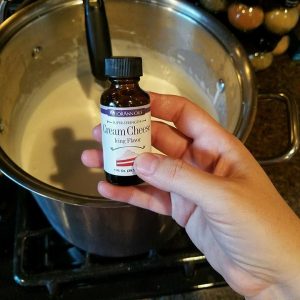
To make this Cream Cheese Ganache, I first brought the Heavy Whipping cream up to a boil. Then it is removed it from the heat & added the 12.5 pounds of chocolate! To help it all melt together I put the lid on it for about 5 minutes. Then I added the 6 tsp of the Super Strength Cream Cheese Icing Flavor. Then just stir vigorously until all the white chocolate was melted and incorporated into the heavy whipping cream.
Now it just has to set up a bit! So I poured the mixture into a giant punch bowl and placed some cling wrap over it. It will be ready to use the next day, just leave it on the counter. **Beware** This is DELICIOUS and hard to keep in your house for any length of time …or from drinking it all before it becomes it’s creamy peanut buttery consistency;)!!
Thursday morning it was time to get to work!
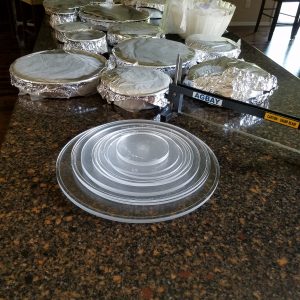
Cutting and filling the cake is first. I always make each tier 4 layers of cake. So to do this with precision I use the Agbay to cut each baked cake into 2 equal layers. This means I cut off the rounded top and about 1/8″ of the very bottom. No one likes the darker bottom edge of the cake do they?! Don’t worry I am not going to throw this away! It is what we use to make the cake pops (stay tuned).
I have the Agbay Jr and LOVE IT! Sometimes wish I would have gotten the bigger one, but so far, so good with the Jr. I just can’t cut cakes bigger than 14″ in diameter! The Agbay Jr., is one of those “cake tools” I couldn’t make stacked cakes without. It will bring your cakes into the professional ranks without having to practice splitting cakes. Because splitting cakes is a TRICK, trust me!!) I mean look at this… If you can figure out a ruler you can use this! And get the exact same results!
Next, it’s time to make the Cream Cheese Icing (my favorite)! To make Cream Cheese Frosting, you just need a few ingredients. Just a little vanilla, a stick of butter (room temp), one package of cream cheese (room temp), and 3 cups of powdered sugar. Cream the butter and cream cheese in the mixer and add the powder sugar and vanilla. That’s it!
Cream cheese frosting is pretty soft. So in order for it to not squish out the sides it needs to be dammed in with stiffer icing! To be on the safe side I used the Cream Cheese Ganache to dam in the icing. To do this just pipe the ganache around the perimeter of the cake and add the frosting to the center.
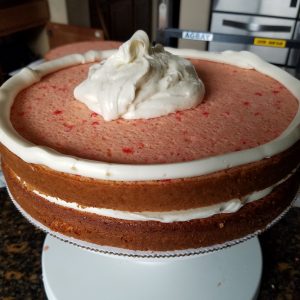
Flatten/smooth out the icing all the way to the dam and Repeat until you get to the height of the tier you want!! Then don’t forget to add wooden dowels or straws down each of the filled tiers (in a circle pattern) so it will the hold the tier above it and won’t weight it down, and sink into the tier underneath – you can skip the top tier;)

To stack and cover the 8 inch double barrel, I followed Marsha Winbeckler’s YouTube tutorial.
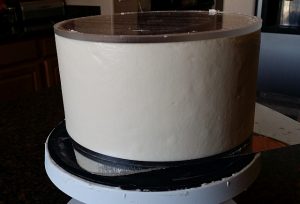
For the other 2 tiers I simply added the acrylic discs to either side and started to add the cream cheese ganache. When you get your layer of ganache up to the thickness of the discs, just use your bench scraper to go around smoothing out the sides.
Next, I decided to bite the bullet and stack all the tiers. This is by far the scariest part for me! Not only is it a little tricky to lift them and get them centered on there without totally messing up the bottom, it’s also a bit more tricky to get them in the fridge after;)!
To center them, I take the acrylic discs and center them on the cake. I used the Sugar Shaper to trace around the edge once I have it in place. Then remove the disc and there is a nice outline of exactly where to put the next tier. Then with my off set spatula I lift the cake and place it inside that traced line. I didn’t have to worry too much about messing up the edge since there was ribbon going around the base. However, if you needed to fix any edges, it’s pretty easy to fill these spots in with a little ganache and an offset spatula.
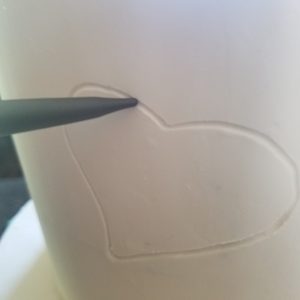
This Heart Cookie Cutter (this one is a Wilton Cutter) was perfect, so I pressed it up against the ganache so it would make an indent.

Then traced that indent with a firm set of Sugar Shapers so it would be a little more pronounced.
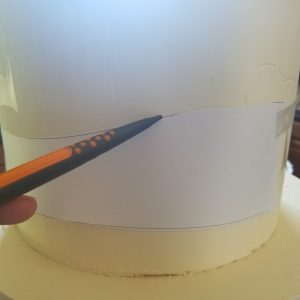
Next, I made the wavy line that went around the cake. I didn’t want to free hand this knowing it might get a little out of control if I did. So I taped a couple pages together and cut the line out there first. Then wrapped it around the 2 cake tiers and used my Sugar Shapers again to indent the line.
Next all I needed was the finishing touches! All the little “v’s” for the seams, all the way around each of the indented lines, ribbon and a topper! I did the piping in Red Royal icing, just because it is easiest to work with! Then I added some black ribbon around the top two tiers and some black and bling ribbon to the base!
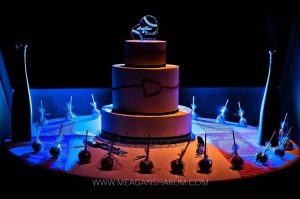
Since I got a laser engraver for Christmas last year I decided to change up the cake topper! I made a personalized acrylic baseball heart topper to the top of the cake. I think it cake out great!
…and I love it in this lighting!

Yes those are all Baseball cake pops around the cake!! Remember all those scrapes of cake from cutting off the tops and bottom? They make for excellent cake pops!! Add all those scrapes to the food processor and add your favorite binder if need be. These doctored mixes are a little more dense then just the regular box cake mix. So I added some of the leftover ganache and turn it on until it looks like dough! Then used the Easy Roller (Of Course!!) to roll a bunch of cake balls! 21 at a time to be exact;)!
Here is what they looked like after I dipped and decorated them to look like baseballs! Check out the quick decorating Video on Facebook!
If you liked this post, share it & the Easy Rollers with your friends and family! …It is baking season afterall!! It’s how we keep posts like this coming!