
I made a Rainbow cake for a special teenage birthday party! I am still a beginner at cakes, I think this is #7 now. But I could hardly wait to show all of you this one! So here it goes, another tutorial brought to you by the HCP-Easy Roller, and HCP mini Easy Roller! I think it turned out super fun and I hope you will pin it to your Pinterest Boards for the day you feel the desire to make a rainbow cake:)!!


Unfortunately, I only have a few pictures, I dropped my phone this morning and now I seem to be having a ton of “Technical Difficulties!” I did manage to share a few photos before the incident, so fortunately I do have those:)! The two tiers are a bit different! The bottom was more of a Tie Dye Effect cake, covered in Swiss Meringue Buttercream and sprinkles. The top was Rainbow layers of cake with SMB between the layers and covered in Fondant and decorated in colored buttercream. For the cakes, I used a 12 inch pan on the bottom and 8 inch for the top. I baked the larger one first and used 2 boxes of cake. Yes, I said box cake;)! I did doctor the mix up a bit. Instead of the directions on the back I made it with 4 eggs, 1/3 cup oil, 1 cup water and I added a package of instant vanilla pudding and 1/2 cup of milk per box of cake. Then I got out 6 small mixing bowls and evenly portioned the batter between the bowls. Next I colored each bowl a different color (Purple, Blue, Red, Orange, Yellow, Green). Once all the bowls were colored I poured each of the bowls of the colored batter into the cake pan, one on top of the other to get the dye effect, then baked it for about 50 minutes. In my arsenal of baking pans, I somehow have three, 8 inch round pans. I don’t even know how that happened, but since I could bake 3 at a time I decided to do the top tier as an 8 inch rainbow layered cake! So I started with the same process as before. Two doctored cake mixes and then separated them out into 6 mixing bowls to color. This time instead of layering the batter all in the same pan on top of one another, I just put one color in each of the 3 pans and baked the colored batter individually. When they were done I baked the last 3 colors in the 3 separate pans. Once those 8 inch layers cooled I leveled the tops off all the cakes with my Agbay Jr. and since that knife can cut 1/8 of an inch layers, I also cut a tiny bit of the bottom off each color (so it would look it’s best once it was cut into)! I did get a picture of this:)!! I love this knife… Can you tell:)??!

At this point I was ready to make the SMB! And for that recipe I have been using Elisa Strauss’ Recipe! It is YUMMY!
I made 2 batches to ensure I had enough for in between all the layers and around the outside as a crumb coat for the top. I also needed a bit more for the bottom tier since I didn’t cover that tier in fondant, it was just SMB and sprinkles! I used Cake Safe’s Acrylic Disc’s for the 12 inch cake. One on top and one on the bottom. These disc’s make the cake REALLY EASY to frost perfectly smooth! You just pack a bunch of frosting on the sides of the cake and then use your bench scrapper to scrape off the excess and smooth it out! All you do is hold the bench scraper up against the disc’s and turn the cake on your turn table! It will come out perfect:)!! So once that was done I popped it in the freezer for a bit – with the discs still on there and waited for it firm up. While I was waiting on the bigger tier, I crumb coated the smaller tier and popped it in the fridge while I prepped the fondant! I am all about tools of the trade! I think if you are newbie you can look like a pro if you have the right tools;)!! So for the fondant I used The Mat to roll it out! I like it because if you are a newbie like me and it takes you a little while to roll out the fondant it wont dry out under there:) It also has measurements all around it and has a cheat sheet on the corner that says how much fondant you need and what size to roll it out to:)!! It really doesn’t get any easier then that! Once I had the top tier done I took the bottom tier out of the freezer and was ready to roll it in sprinkles:)!! I got a jelly roll pan and filled it with sprinkles. Then with the Acrylic Discs still in place I just turned it on it’s side and rolled it around in the sprinkles:)!! Check it out!!

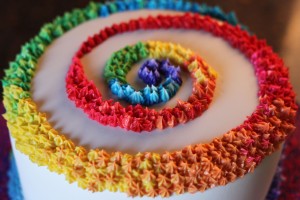
Once the sides were coated, I carefully take off the discs. I took the bottom off first (slide a skinny object in between the cake and the disc – like a icing spatula) and go around until the disc is free. Then put your cake circle over the exposed “bottom” (even though this is your top right now) and flip the cake over onto the cardboard cake circle. Then take off the top disc in the same way! Once the top was off I added a bit more frosting and then poured more sprinkles to cover the top and used a sheet of wax paper to go over all the sprinkles and set them in their place. All that was left on this cake was to add the finishing touches to the top tier! The Rainbow spiral! To do this I used a small open star tip (Ateco 17) and colored buttercream. I used 7 bowls for the frosting, the six colors we did the cakes in and I left one bowl with just white so I could lighten each color a bit and fill in a few spots with the lighter color. You really don’t need much frosting for this part! I filled the pastry bag just about 1 inch over where the tip sits in the bag.


That was how I made this cake!! But of course, anything I do wouldn’t be complete with out cake pops!! So I took the scraps from the cake and turned them into cake pops:) I was able to make about 35 cake pops just out of cake tops …and the 1/8 inch off the bottoms;) Not bad extra profit for something that otherwise may have ended up getting tossed?! Especially since I was able to roll them out quickly in the Easy Roller! (check out our new Mini Easy Roller too!)


Then I dipped them in white candy melts and added sanding sugar to each one while they were still wet. Finish them up while putting them in your favorite cake pop stand to dry:)!


If you liked this tutorial don’t forget to share this post and our Easy Rolleror the new Mini Easy Roller with your friends and family! It is how we keep them coming:)!!
Oh, I almost forgot!! I don’t normally get inside pictures of the cake, but she sent me this one after it was cut! I thought you might like to see it?!
