
I saw my first Cake Pop Rose made by the Very Talented Carol at Just a Little Something almost 2 years ago and I was in AWE! I thought I would share with you how I made a smaller, “rose bud” version …A little easier to master and still pretty;)! Supplies I used to make Candy Clay RoseBud cake pops: Easy Roller (Of course!) For these roses I used the additional 1 inch insert for the base of the rose; Lollipop sticks; Candy Clay we made in the How To Video; Cake Dough; Circle Cookie Cutter; Almond Bark; rolling-pin; Wax Paper; Cake Pop Stand (not pictured here)

If you don’t have an Easy Roller or the 1 inch insert:( you can roll them by hand of course, it just takes longer;)! If you want additional information click here!
Next step is to form little tear drop shapes like this from the 1 inch balls. Take the 1 inch balls and pinch one end and twist to shape them. This step I found to be the most important. If they are left just ball-shaped when you wrap the “pedals” it just doesn’t look right.

Then dip them into the candy melt color of your choice! I used white, but they will be covered up;) Place them in a cake pop stand to dry completely.

Then you will need to prepare some of the candy clay! I made one of each color, so for each color rose bud you will need one oblong piece (this doesn’t have to look perfect, just flatten out the candy clay), and 2 half circles. The Circle size will depend upon the size of the pop you have and how big you want the rose bud. This circle cutter was about 2-3 inches. Make them pretty thin, yet thick enough to pull off the wax paper without tearing. I think they look best when the outer most edge is thinner then the body of the piece of candy clay.

You will take the oblong piece first. Hold the cake pop sideways and lay the oblong shaped candy clay over the top. The candy clay will hang over the side of the pop.

Stick one of the sides to the pop and then twist the pop so that oblong shape wraps around the pop. You are trying to get the center most part of the rose bud. See below!
 Next will take one of the half circles and place it over the section of the “rose bud” where the two sides come together. Loosely apply this “pedal.” It’s better to attach it at the center point of the half circle and move over to only one side of the pop, leaving one side loose. This way you can tuck the other half circle into the opposite side.
 Take the other half circle piece of candy clay and tuck it into the opening of the first half circle “pedal,” the side you didn’t attach and left open. Secure that side, then wrap the candy clay around the pop until it covers over the start of the first half circle “pedal.” These are the pedals that look best when the edge is thinner then the base!

Next take a small piece of wax paper and start blending the base of the pedals. Leaving the top portion of the pedals alone. Smooth out all the candy clay so it covers the base of the pop and all the connecting lines from the assembly of the flower are gone.

When you are finished you should have something like this

Repeat for each color and each rose bud

And the Pink

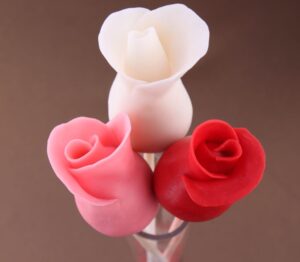
The Final Photo Shoot:)!

So what do you think? Are you ready to make some rose bud cake pops for Valentine’s Day?! Don’t forget to check out our Easy Roller, it is how we can keep these tutorials coming:)! To just order one already… Click here!