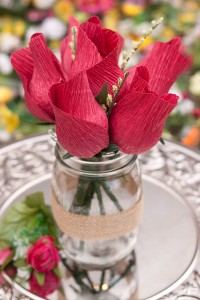
Lets learn how to make these Crepe Paper Cake Pop Roses!
WHAT YOU WILL NEED:
- Box Cake Mix of your choice (Or your favorite recipe)
- 3 Eggs
- water
- Vegetable Oil
- Red Candy Melts
- Red Sanding Sugar (optional)
- 6 inch Cake Pop Sticks
- Mini Easy Roller (optional)
- Red and Green HEAVY DUTY Crepe Paper
- Green Floral Tape
- Mason Jar/Lid
- Scrap burlap (optional)
- Glue dots (optional)
- Accent silk flowers (optional)
THE BASICS:
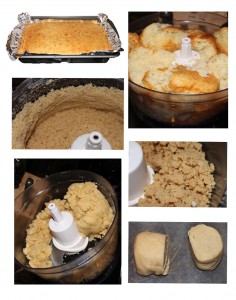
All Cake Pops start off with a baked cake, and these Crepe Paper Roses are no different! This can be store bought or your best recipe. Next you are going to crumble it down and knead those crumbs into a “Play-doh” like consistency. I always use my Food Processor to do this, but a mixer with a paddle attachment works just as well! It is much faster than doing it by hand and you will get more consistent results.
Take a look at the steps it goes through in about 1 minute! First it will break down into fine crumbs, then they start to stick to each other and form a bit bigger of a crumb and finally if you leave it in long enough it will turn into a big ball of dough all by itself!
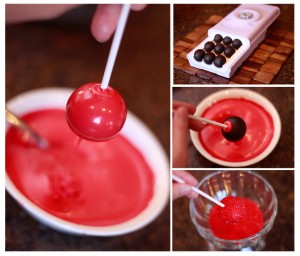
Next you will roll all your cake dough into 1.25 inch balls (about the size of a ping pong ball). For faster, more consistent results, the Mini Easy Roller rolls 9 cake balls at a time and will allow you to fly through this step!
Once you have finished rolling, place the cake balls into the fridge. It’s always easier, in my opinion to dip cake balls if you refrigerate them for a bit first.
We used red candy melts on this project and to melt them down we simply put them into the microwave on 50% power in 30 second increments. Stir at each increment and continue heatng until the candy melt has an even flow to it.
Next you will dip the 6 inch cake pop stick into the melted red candy melts and into the cake ball. This creates somewhat of a bond between the stick and the cake ball. Next dip the entire cake ball into the red candy melt and before the candy melt sets, roll in the red sanding sugar. If you don’t have sanding sugar you can skip this step, I use it as it adds a nice little sparkling effect and deepens the red color. As a bonus it also hides any dipping flaws!
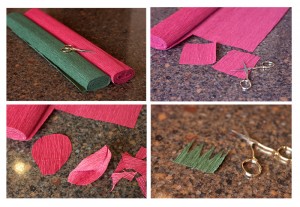
Next prepare the crepe paper! REMINDER: this is heavy duty crepe paper, as your normal “streamers” won’t have enough stretch! You will need to cut at least 2 approximately 6 inch tall by 3.5 inch wide, rectangle. This is per rose bud, so repeat as necessary. The “stretch” will be the wide part. Next gather both pieces and round out the top and cut a more narrow base. Next you will just need to cut a small piece out of the green, approximately a 1 inch square. Cut “Vs” all the way across.
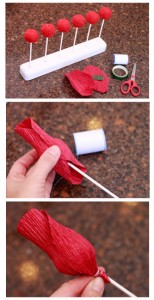
Now that your paper is prepared, take your finished cake pops and 2 of the petal shapes from the crepe paper. Give the Crepe Paper a little stretch in the center, so your cake ball will fit, cupped inside. Now take the second piece and repeat, only fit it on the opposite side. Now take a length of string and wrap it tightly around the base, securing these two petals.
Now it is time to attach the green Crepe Paper. Place it just over the string and when you have it in place tie it into place by wrapping another length of string. Secure it with the green floral tape and tape down the stick starting at the base of the bud covering the string.
THE FINISHED PRODUCT:
Now place all your finished roses into your mason jar fitted with a strip of burlap secured by glue dots. I also mixed in a few pieces of small silk flowers.
If you need help finding anything in this post, here are a few resource links:
- HCP Easy Roller for the Mini Easy Roller
- Fillmore Container for Mason Jars
- Papermart.com for Crepe Paper
- Joann Fabric and Crafts for Candy Melts, 6 inch cake pop sticks, burlap, silk florals, green floral tape, string, etc
If you like the tutorial don’t forget to check out and share our Easy Roller or New Mini Easy Roller with your friends! It is how we keep these tutorials coming:)!

