
For those of you who do not know what “PEEP’s” are, they are a delicious Easter time tradition around here when it comes to Easter Basket Candy!! They are cute little marshmallows in the shape of a chick or a bunny and they are rolled in collored sugar! I think they get better with age too… I like them when the marshmallow is a little stale:)
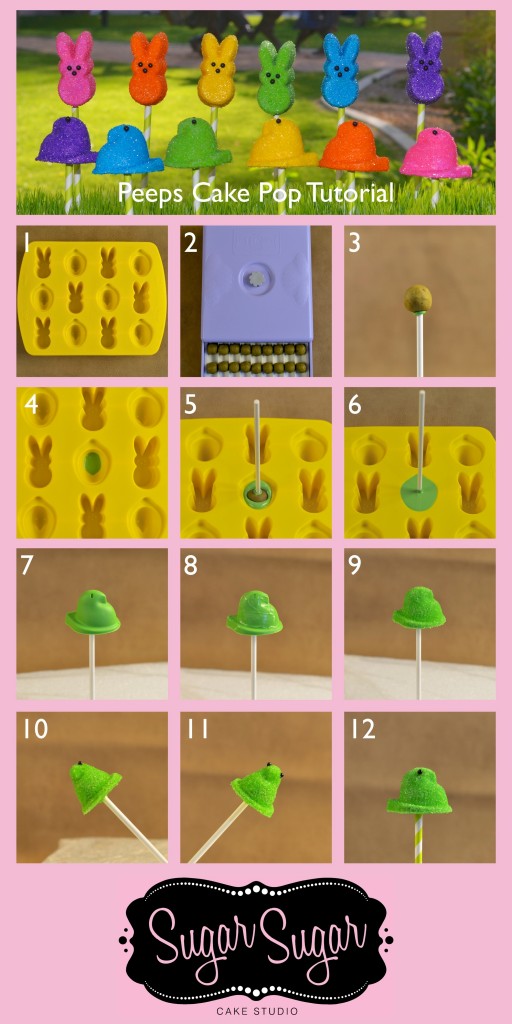
This however was the first time I saw my two favorites collide:)! PEEPS & Cake Pops!!! The Familiar shape of PEEP’s bunnies and chicks with the yummy insides of a cake pop this time!! Take a look at what The Sugar Sugar Cake Studio put together for us! It’s a pic-toral check it out!!
Isn’t that the cutest Pic-torial Ever! Gotta “Like” Sugar Sugar for sharing, right?! …I left their button below, just in case you feel motivated to see more from these two 🙂
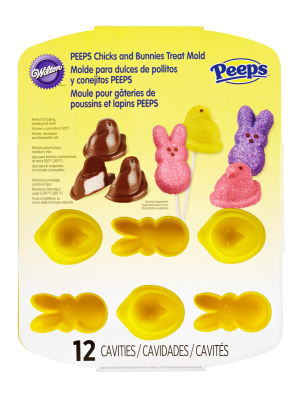
- Step 1 – Obtain the Wilton 12 Cavity PEEPS Chicks and Bunnies Treat Mold. Try your Local Craft Stores!
 Step 2 – Use the Heavenly Cake Pops Easy Roller with the 1″ optional insert to roll the cake balls and chill to firm them.
- Step 3 – Melt candy coating in the desired color of the completed Peeps cake pops. Allow the cake balls to sit out at room temperature for a few minutes. Dip the end a cake pop stick into the melted candy coating and insert into the base of each cake ball. This will help to hold the pops on the sticks.
- Step 4 – Spoon a bit of the melted candy coating into the “head” area of each chick cavity in the mold. Allow the candy coating to set up. This will prevent the cake balls from settling too far into the mold.
- Step 5 – Spoon a bit more of the melted candy coating into each chick cavity in the mold. Place a prepared cake ball on a stick into each cavity and gently press the cake ball into the melted candy coating. Make sure the stick is straight in all directions. Note that the cavity will not be completely filled with candy coating at this point. Allow the candy coating to firm up about 10 minutes.
- Step 6 – Spoon melted candy coating over the cake ball to fill each cavity. Allow the candy coating to harden about 15 minutes in the refrigerator. The candy coating needs to be firm before proceeding to the next step.
- Step 7 – Hold each cake pop by the stick and gently “peel” the silicone mold away from the cake pop with your other hand. If the candy coating is properly hardened, the mold should peel away easily from the pops. Place the pops into Styrofoam to hold them as you complete the following steps.
- Step 8 – Use a paint brush to apply a light coat of full-strength piping gel all over each Peep pop, including the base. The piping gel will adhere the sanding sugar that will be added to the pops in the next step. Do not allow the piping gel to “dry” on the pops before proceeding to the next step. If you don’t have piping gel, a quick run through heat will do! I turn on the stove and hold the pop about 12 inches from the heat and turn the pop till it barley shines! Not too much or you may have a mess! You just want to have a surface the sugar will stick to:)
- Step 9 – Sprinkle sanding sugar in the desired color of the completed Peeps cake pops over each pop. Sprinkle the sugar over a bowl so that you can capture and re-use the sanding sugar. Place the pops in Styrofoam for at least 20 minutes to allow the piping gel to set before proceeding to the next step.
- Step 10 – Attach a black sugar pearl to each pop for one of the eyes. Use tweezers to dip a sugar pearl into a bit of piping gel to adhere it to the pop. Place each pop into Styrofoam at an angle for about five minutes to hold each eye “level” until set. You can also pipe on a small dot for the eyes with candy melts or use a toothpick and some black food color!
- Step 11 – Repeat Step 10 for the second eye.
- Step 12 – The pops are now complete. If desired, place a decorative paper straw over the cake pop sticks.

